Quick Reference
Usage: secursign [options]

-sign                 : Digitally sign the document (default).
-keypath <string>     : Path to key location
-keypass <string>     : Password to access key; password to pkcs-12 file
-name <string>        : Common name of the signer of the PDF file
-reason <string>      : Reason why the signer is signing the PDF file
-location <string>    : Physical location of the signing

-addfieldonly         : Add signature field to document without signing.
-newsigfield <string> : Name of new signature field.  (Requires top, left, bottom & right)
-page <int>           : Number of page, on which, to add the new signature field.
-top <int>            : New signature field position - top
-left <int>           : New signature field position - left
-bottom <int>         : New signature field position - bottom
-right <int>          : New signature field position - right

-f <string>           : Name of existing signature field to sign
-seal <string>        : Path to PDF document containing the signature background seal
-sealpage <int>       : Source page containing the signature background seal
-pdfa                 : Support PDF/A documents
-font <string>        : Font used for signature; any OpenType font
-fontsize <int>       : Font size of signature text.
-offset <int>         : Signature text offset from the left edge of the signature field - 0 to 100%.
-listfonts            : Print list of available fonts in the appligent_home fonts folder

-verify               : Verify Signature
-printcert            : Print Certificate Information during signature verification

-rc4                  : Encrypt using the RC4 encryption algorithm
-aes                  : Encrypt using the AES encryption algorithm
-keylength <int>      : Key Length.  Valid options are 40, 128 & 256.  Default is 128.

-ownerpass <string>   : New Owner Password (Required)
-userpass <string>    : New User Password

-onlyattach           : Encrypt attachments only; uses AES encryption algorithm.

-noprint              : Do Not Allow Printing
-nomodify             : Do Not Allow Modifying the Document
-nocopy               : Do Not Allow Copying text or graphics
-nonotes              : Do Not Allow Adding or changing notes or form fields
-nofill               : Do Not Allow Fill or Sign of Form Fields
-noaccess             : Do Not Allow Accessibility
-noassembly           : Do Not Allow Document Assembly
-nohighres            : Do Not Allow High Resolution Printing

-remove               : Remove all encryption from the PDF document. (Requires -d OwnerPassword)

-d <string>           : Old Owner Password to Decrypt the file

-optimize             : Combine -flate, -rascii, -nolzw, -optxobj, -optcontent and -optfonts

-nocomp               : Do not compress using Object Streams; compatible with all versions of Acrobat
-comp                 : Compress using Object Streams; Acrobat 6 and later
-iso32000             : Set file for ISO 32000 compliance (PDF 1.7)

-w                    : Linearize saved file
-nomod                : Retain current file modification date
-o <string>           : New output file name, for multiple inputs, a path to an output directory
-l <string>           : Write progress to the given log file name
-p                    : Log progress information
-v                    : Print version information
-r <string>           : Application serial number
-h                    : Show help
-help                 : Show help
Introduction
Overview
SecurSign is a server-based application which Encrypts, Digitally Signs and Verifies Digital Signatures on PDF documents. Digital signatures placed by SecurSign are compatible with the Adobe® Acrobat® Digital Signature Mechanism and can be verified using Adobe Acrobat or Adobe Reader.
SecurSign is designed to run in real time with other processes in an unattended environment to handle high-volume and on-demand production needs. SecurSign can also run in batch mode to encrypt, digitally sign or verify large collections of PDF documents.
NEW in SecurSign 5!
- Signature Validation ~ detects tampering!
- 2048-Bit Key Lengths ~ the latest standard for Digital Certificates!
- OpenType Fonts ~ Place signature text using any OpenType font!
Digital Signature and Verification Features
- Digitally Sign using visible or invisible digital signatures
- X.509v3 Digital Certificates from any Certificate Authority
- Add Signature Fields to any PDF page
- Multiple Digital Signatures can be applied sequentially
- Custom Graphics including watermarks, logos and handwritten signatures
- Verification to detect file modification or tampering since it was signed
- Linearization to optimize signed PDF documents with Fast Web View for faster viewing on a network
- No additional software is required – use any digital-signature aware PDF viewer to view or verify signatures
Encryption Features
- Advanced Encryption Standard (AES ) encryption algorithm with 128-bit or 256-bit key lengths
- RC4 encryption algorithm with 40-bit or 128-bit key length for compatibility with older PDF viewers
- Secure envelopes; encrypt PDF and non-PDF attachments, leaving the “envelope” PDF unencrypted
- Set User Passwords to control who may view, print, or modify a document
- Set Owner Passwords to control who may change security settings
- Set Document Permissions to control viewing, printing, copying, assembly and accessibility.
Technical Features
- X.509v3 Digital Certificates
- PKCS#12 Personal Information Exchange Syntax Standard
- SHA-1 Message Digests
- RC4 Stream Ciphers
Encryption
SecurSign can encrypt using the Advanced Encryption Standard (AES ) encryption algorithm; or; the RC4 encryption algorithm for compatibility with older PDF viewers.
The Advanced Encryption Standard (AES ) encryption algorithm supports 128-bit or 256-bit key lengths.
The RC4 encryption algorithm supports 40-bit or 128-bit key lengths.
The following security features are available at the 40-bit encryption level:
- Do not allow printing
- Do not allow modifying the document
- Do not allow selecting text and graphics
- Do not allow adding or changing notes and form fields
At the 128-bit encryption level, these additional security features are available:
- Do not allow filling-in or signing of form fields
- Do not allow accessibility
- Do not allow document assembly
- Do not allow high-resolution printing
Using AES encryption, these additional security features are available:
- Encrypt attachments only
At all encryption levels, two types of passwords can be assigned to your documents:
- User password: required to open a document
- Owner password: required to change permissions and passwords
An Owner password should always be assigned to prevent other users from changing your security settings. If a document is already encrypted and has an Owner password, only a person who knows the password can re-encrypt the document with different security options.
Digital Signatures
A digital signature serves two purposes: it identifies the signer of a document and it guarantees the document’s integrity. SecurSign is compatible with the Adobe Acrobat Digital Signature Mechanism. It uses the Adobe Raw Signature Format to create digital signatures on PDF files using standard X.509 digital certificates available from commercial certificate authorities. While Adobe Acrobat and Adobe Reader can be used to verify signatures applied with SecurSign, these products are not required to apply digital signatures. You can apply two types of digital signatures with SecurSign:
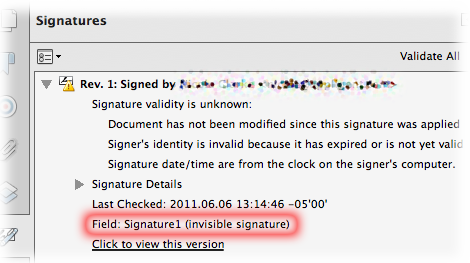
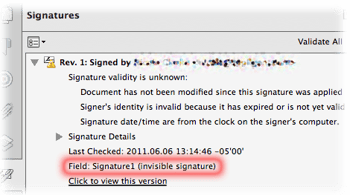
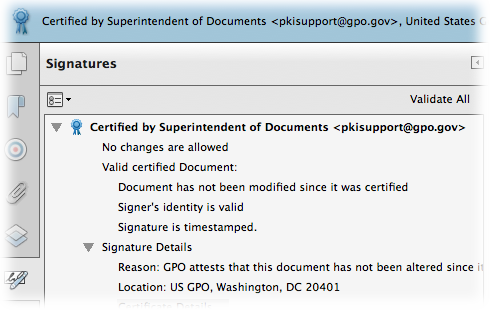
- Invisible signature (also called blind signature) — The signature is not displayed in the document. It is only viewable in the document’s Signatures pane (as shown in the figure below).
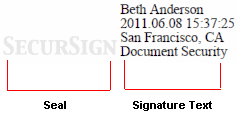
- Visible signature (also called signature with appearances) — The signature is displayed in the document. It can be placed in an existing form field (it doesn’t have to be a signature field) or in a new signature field that you create using SecurSign. The new field can be positioned anywhere on the page. A visible signature contains two parts: a seal and signature text. The signature in the figure below uses the default seal supplied with SecurSign, but it can be replaced with any image in PDF format. Here’s an example:
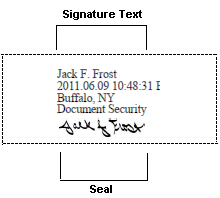
A handwritten signature is used for a custom seal in the signature shown in the figure below. Note that the signature text is above the seal, rather than to the right of it, as in the previous example.
Sequence of Operations
Encrypting a signed file corrupts the signatures in the file, so it’s important to use SecurSign in the correct sequence, as follows:
- Encrypt
- Sign
Building SecurSign into a Workflow
As a server-based command-line driven application, SecurSign can be easily incorporated into scripts that you build to add security to already processed documents. Appligent sells a suite of products for modifying and customizing PDF documents, of which SecurSign would be the final step before document delivery. The additional products include:
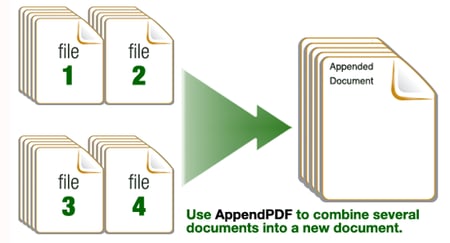
- AppendPDF Pro — Append several PDF documents or pages of documents together to produce one complete document. Add a cover page and a table of contents, as well as text or JPEG image stamps, to any of the pages.
- FDFMerge — Merge PDF forms together with FDF or XFDF data files to create a completed form. With FDFMerge’s form-flattening feature, form fields can be removed, making the output document more portable and less easily modified.
- StampPDF Batch — Add text, PDF, JPEG or TIFF images to PDF documents as headers or footers, watermarks, etc., which can include page numbers, date/time, file names, and more. Stamps can be in any RGB color, Adobe PostScript Type 1 font, point size, and position. They can be overlaid or underlaid text, outline text, invisible text and/or multi-line.
More information on these and other Appligent products is available on our Server Software information page.
About the Examples in This Guide
Many of the example commands in this manual reference files that are available to you in the samples subdirectory where SecurSign was installed. You can use these files to try the commands yourself by substituting your information for the option specifications in the examples.
Understanding a typical example command
The following illustrates a typical example command from this guide. Like all of the example commands, it is run from the directory that contains the SecurSign application. Note that the Windows path specification format is used (backward slashes).
$ secursign -p -encrypt -ownerpass Pa55w0rd -userpass paSsWoRd -nomodify -noassembly -nonotes -nofill -nohighres -nocopy -o pathname\secured128.pdf pathname\securitysample1.pdf
The secursign command is required at the beginning of the command line. Following it are command-line options, which begin with a dash. Some options are followed by values; others are not. The -o option, for example, requires an output file name (secured128.pdf in this example). An input file is required at the end of the command. We recommend full path names for all files.
Trying the example command in Windows
In Windows, the default installation directory is C:\Appligent\SecurSign\, and the default samples subdirectory is C:\Appligent\SecurSign\samples\. If you accepted the installation defaults, then you would submit the command from C:\Appligent\SecurSign\ and expand the pathnames in the command as follows. The path for the secured128.pdf file assumes that you want to direct your output to the samples subdirectory.
> secursign -p -encrypt -ownerpass Pa55w0rd -userpass paSsWoRd -nomodify -noassembly -nonotes -nofill -nohighres -nocopy -o C:\Appligent\SecurSign\samples\secured128.pdf C:\Appligent\SecurSign\samples\securitysample1.pdf
Trying the example command in UNIX or Macintosh
In UNIX and Macintosh systems, the SecurSign directories are wherever you install them. If you installed SecurSign in /apps/secursign/ and the sample files in /apps/secursign/samples/, then you would submit the command from /apps/secursign/ and expand the pathnames in the command as follows. The path for the secured128.pdf file assumes that you want to direct your output to the samples subdirectory.
$ ./secursign -p -encrypt -ownerpass Pa55w0rd -userpass paSsWoRd -nomodify -noassembly -nonotes -nofill -nohighres -nocopy -o /apps/SecurSign/samples/secured128.pdf /apps/SecurSign/samples/securitysample1.pdf
Getting help with the command-line
If you are new to entering commands in a terminal window, or just need a refresher, read Command Line Introduction before trying the example commands in this manual.
Typographic Conventions Used in this Guide
The following typographic conventions are used in this guide:
- Courier Font is used for commands, command options, and output to mimic the appearance of the screen:
the -encrypt option
- The dollar sign character ($) is used to represent the command prompt:
$ secursign -encrypt -ownerpass Pa55w0rd -noprint -o outfile.pdf samplefile.pdf
- Square brackets in a command indicate that the enclosed information may optionally be included but is not required. In the following example, [inPDFFile2…] indicates that additional input files may be included with the command, but are not required.
$ secursign -encrypt -ownerpass Pa55w0rd -noprint -o outDIR inPDFFile1 [inPDFFile2...]
Credits and Trademark Information
This product includes software developed by the OpenSSL Project for use in the OpenSSL Toolkit.
This product includes cryptographic software written by Eric Young (eay@cryptsoft.com).
Installation
Introduction
SecurSign® is a command-line driven server-based application that can apply and verify digital signatures in PDF documents. SecurSign can also apply standard Adobe® Acrobat® security features to PDF documents. SecurSign is designed to run in tandem with other processes in an unattended environment and to handle high-volume and on-demand production needs.
Memory Requirements
Minimum free memory available to run the application: 512 MBytes
Windows Installation
Windows installation is handled by the installer and does not require any special handling.
Unix Installation
Setting environmental variables (All Unix Platforms)
In this release, there are two additional environmental variables that need to be set for SecurSign on all UNIX platforms. If you run SecurSign from the secursign script created during installation, these environmental variables will be set by the script. If you run secursignapp directly, you will need to set these environmental variables to run SecurSign. Once SecurSign is installed, you can view the variables needed by looking at the secursign script created by the installer.
Setting the Appligent home directory (All Unix Platforms)
The environmental variable that stores the location of the Appligent home directory is APPLIGENT_HOME. The default location for the Appligent home directory is /usr/local/appligent. The Appligent home directory contains the library files and resources needed to run SecurSign. It also contains license information for SecurSign.
Example:
export APPLIGENT_HOME=/usr/local/appligent
Setting the APDFL library path ( All Unix except AIX )
The APDFL library path must be added to the LD_LIBRARY_PATH variable. The APDFL library path is located in a subdirectory of the APPLIGENT_HOME directory.
The path should be set to ${APPLIGENT_HOME}/APDFLX.X.X/Libs
Example:
export LD_LIBRARY_PATH=${LD_LIBRARY_PATH}:${APPLIGENT_HOME}/APDFLX.X.X/Libs
Setting the APDFL library path ( AIX Only )
The APDFL library path for AIX must be added to the LIBPATH variable. The APDFL library path is located in a subdirectory of the APPLIGENT_HOME directory.
The path should be set to ${APPLIGENT_HOME}/APDFLX.X.X/Libs.
Example:
export LIBPATH=${LIBPATH}:${APPLIGENT_HOME}/APDFLX.X.X/Libs
Registration Numbers for SecurSign 5.0
In previous versions of SecurSign, the SecurSign registration number was required as a command line option with the -r flag each time secursignapp was run. A secursign script was provided that automatically added -r and the registration number to the secursignapp command line when the script was run.
In the current release, in addition to getting the registration number from the command line, SecurSign can get the registration number from a license file in the Appligent home directory. On UNIX systems, license files are created by the installation script and stored in the ${APPLIGENT_HOME}/license directory. For Windows, the license file is created by the installer and stored in the /All Users/Application Data/Appligent/License directory. With a valid license file, the -r is no longer required on the command line. The -r option can still be used as in previous versions, and will override the value in the license file.
General Options
Introduction to General Options
The common options discussed in this chapter deal with product information, progress messages, and file maintenance. The following sections detail the use of these options.
Note: See Command-Line Options for Digital Signatures for detail about options specific to SecurSign.
Command Syntax
$ secursign [options] [-o outFilePath] inPDFFile
General options — summary
The following table provides a summary of the general command-line options.
| Option | Parameter | Description |
|---|---|---|
| -r | <string> | Pass registration number to SecurSign. |
| -l | <string> | Write progress information to the given log file name. |
| -p | Provide progress messages. | |
| -v | Display version information. | |
| -h or -help | Display usage information. | |
| -o | <string> | Name of new output file or, for multiple inputs, an existing directory name (required). |
| -w | Linearize the file upon save. | |
| -nomod | Retain current file modification date | |
| -optimize | Optimize the output file to try to reduce file size | |
| -nocomp | Do not compress using Object Streams (resulting file is compatible with all versions of Acrobat) (SecurSign 4 & 5). | |
| -comp | Compress using Object Streams (resulting file requires Acrobat 6 and later) (SecurSign 4 & 5). | |
| -iso32000 | Set file for ISO 32000 compliance (PDF 1.7) (SecurSign 4 & 5). |
General options — detailed
The following sections provide details on using the general command-line options.
-r <string> — Pass registration number to SecurSign
This option can be used to supply your registration number to SecurSign from a script or another application:
$ secursignapp -r XXXX-XXXX-XXXX-XXXX-XXXX-XXXX [options]
This option is typically not necessary and is available for use in cases where the Appligent License File can not be located by the application because of runtime environment restrictions.
-l <string> — Write progress information to log file
Write to a text file any errors and/or progress messages. This option is helpful for debugging. The -l option must be followed by a file name.
Note: If the log file you specify is a read-only file, a warning is displayed and nothing is written to the log file. Make sure that your log file is write-enabled. Your log file will look different if you are also using the -p option.
-p — Provide progress messages
Write progress messages to the screen (STDOUT, the standard output of your system). This option is helpful for debugging and for understanding how SecurSign works.
A note on using the -p and -l options together
As outlined in the above sections, the -p option displays progress messages on your screen, and the -l option writes error messages to a file if errors occur. The following table provides more detail on using these options alone or together.
| -l | -p | errors | Result |
|---|---|---|---|
| Nothing is written to the screen or to the log file you specify. | |||
| Progress messages are written to the screen and secursign.log. | |||
| Progress messages are written to the screen and to the log file you specify. | |||
| Errors are written to the secursign.log file, which is created in your working directory. | |||
| Errors are written to the log file you specify. | |||
| Errors are written to secursign.log and your screen. | |||
| Both progress and error messages are written to the screen and to the log file you specify. |
Therefore, -l used on its own only goes into action if there are errors. With -p and -l combined, you get a text file with full details on SecurSign operations, whether there are errors or not.
-v — Display version information
Display the version of SecurSign you are running. This is important when corresponding with support@appligent.com. In order to best understand your problem, we must know what version of the software you have. SecurSign does not do any other processing when the -v option is specified.
-h or -help — Display usage information
Display all available command-line options. SecurSign does not do any other processing when the -h or -help option is specified.
-o <string> — Name of new output file or, for multiple inputs, an existing directory (required)
If you are processing one input file, specify an output file to save the results. If you are processing more than one input file at a time, specify an existing directory to save the resulting files.
Note: If you do not specify an output file, the original file will be overwritten which is not recommended. If running multiple files and an output directory is not specified, the command will fail.
-w — Linearize the file upon save
Save the output file as a linearized document. Linearization reorganizes the file to make it more efficient for web delivery of large, multipage documents. Individual pages can be rendered before the entire document has downloaded, so the user can start reading the document sooner.
Note: There are four new options available in SecurSign 4.x and later.
-nomod — Retain current file modification date
Do not change the Modified date of the document.
-optimize — Optimize the file (optional)
This flag will do the following: 1) encode any non-encoded streams using Flate compression, 2) remove ASCII85 filters from all streams, 3) replace LZW encoded streams with Flate encoding, 4) merge identical XObjects and images, 5) optimize common sequences in page content, and 6) merge identical font descriptors and encodings. This option will usually result in a smaller file size.
-nocomp — Do not compress using Object Streams (optional)
This flag will not compress Object Streams, resulting in a document that is compatible with all versions of Acrobat.
-comp — Compress using Object Streams (optional)
This flag will compress Object Streams, resulting in a document that is compatible with Acrobat 6.0 and later.
-iso32000 — Set file for ISO 32000-1 compliance (optional)
This flag sets the file for compliance with ISO 32000-1:2008 (PDF 1.7).
Applying Standard Security with SecurSign
Acrobat Standard Security
Acrobat standard security allows you to control who can access your document and, by setting permissions, how much they can edit or print. Acrobat offers three levels of security:
- Low-level encryption (40-bit key length) — Compatible with Acrobat versions 3 and later.
- High-level encryption (128-bit key length) — Compatible with Acrobat versions 5 and later.
- AES encryption (128-bit key length) — Available only with Acrobat 8 and later.
- AES encryption (256-bit key length — available for SecurSign & APCrypt only) — Available only with Acrobat X, XI and DC.
High level encryption provides a higher level of security and finer control over security features. The minimum level of security that you can set is to allow any changes except extracting pages.
Once you set encryption on a document, it cannot be processed in other ways unless the password is available to the processing software. You can also change or remove encryption in Acrobat.
Owner and user passwords
All levels of security allow you to set passwords for the document:
- User password: controls who may view a document.
- Owner password (required): controls who may make changes to permissions and passwords securing a document.
You must set an Owner password to apply encryption. Do not use the same password for both User and Owner. If the same password is used for both, only the User password will be set.
Different versions of Acrobat use different terminology to refer to the same concepts. You’ll see more of this in High-level encryption password nomenclature as described in the following table for various versions of Adobe Acrobat:
| Type | Acrobat X, XI & DC |
|---|---|
| User | Document Open |
| Owner | Change Permissions |
Encryption Permissions
Acrobat allows you to set various permissions to limit access to the information in the document. Adobe changes the use of permissions when they moved from 40-bit key lengths to 128-bit key lengths. The sections below detail the different options and permissions based on using 40-bit or 128/256 bit key lengths.
The following is an example of the security options in Acrobat X, XI & DC:

Refer to Verifying Security Features for instructions on displaying the security options.
Encryption options
The table below describes low-level encryption options.
High level encryption provides additional security options as are defined in the table below.
| Type | Option | Parameter | Description |
|---|---|---|---|
| Encryption | -encrypt | Encrypt using the RC4 stream cypher (same as -rc4) | |
| -aes | Encrypt using the Advanced Encryption Standard (AES) algorithm (SecurSign & APCrypt) | ||
| -rc4 | Encrypt using the RC4 stream cypher | ||
| -keylength | 128 | Key length. Valid options are 40, 128 or 256. Default is 128. (256 bit – SecurSign & APCrypt Only) | |
| -ownerpass | oPassword | New owner password (required) | |
| -userpass | uPassword | New user password | |
| -onlyattach | Encrypt document attachments only using AES; to use the PDF as a secure envelope for the attachments (requires -userpass) (SecurSign Only) | ||
| -remove | Remove all encryption from the PDF document. (Requires -ownerpass) | ||
| -d | Password | Old owner password – (Except AppendPDF & AppendPDF Pro) | |
| Permissions | -noaccess | Do not allow accessibility (128 & 256) – (256 bit – SecurSign & APCrypt Only) | |
| -nocopy | Do not allow copying text or graphics | ||
| -noprint | Do not allow printing | ||
| -nohighres | Do not allow high resolution printing (128 & 256) – (256 bit – SecurSign & APCrypt Only) | ||
| -nomodify | Do not allow modifying the document | ||
| -nonotes | Do not allow adding or changing notes or form fields | ||
| -nofill | Do not allow filling in form fields or signing (128 & 256) – (256 bit – SecurSign & APCrypt Only) | ||
| -noassembly | Do not allow document assembly (128 & 256) – (256 bit – SecurSign & APCrypt Only) |
The first four permissions can be used in any combination, except you can’t use -noprint and -nohighres together. Choose one or the other. The last four must be used in specific combinations that Acrobat accepts.
-encrypt — Encrypt output file (optional)
Specifies applying encryption to the output file using the RC4 stream cypher. This option is the same as -rc4.
-aes — Encrypt using the AES cryptography algorithm (optional) (SecurSign & APCrypt Only)
Encrypt the output file using the Advanced Encryption Standard (AES) cryptography algorithm.
-rc4 — Encrypt using the RC4 cryptography algorithm (optional)
Specifies applying encryption to the output file.
-keylength <int> — Encryption level (optional)
Specifies the encryption key length used to encrypt the document: either 40-bit, 128-bit or 256-bit. (256- bit SecurSign & APCrypt Only)
If you do not specify key length, the default is 128-bit.
-ownerpass <password> — New owner password (required)
Specifies a new Owner password to apply encryption. An Owner password restricts you from altering the security settings. You are not prompted for a password to open the document, only if you try to change the security settings. Passwords are case sensitive and are required when applying encryption.
Choose passwords carefully. They should not be able to be guessed easily but at the same time should not be too difficult for you to remember. If you forget a password, there is no way to recover it from the document. Therefore, it is a good idea to note passwords in another secure location.
-userpass <password> — Set user password (optional)
Specifies a User password for the document. Setting a User password prevents a document from being opened unless the correct password is supplied. Passwords are case sensitive.
Below is the Document Open Password dialog box.
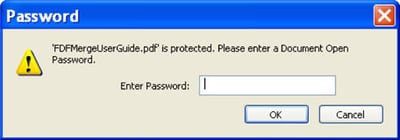
When someone tries to open the document in Acrobat they will be asked for the password.
User password is optional. If you do not specify a User password, anyone can open the document.
-onlyattach — Secure Envelope(optional) (SecurSign Only)
Utilize PDFs as secure envelopes; apply 256-bit AES security to PDF and non-PDF file attachments while leaving the PDF itself unencrypted.
-remove — Remove all encryption from the PDF document
Removing encryption from the PDF document requires the document owner password using -ownerpass.
-d <string> — Old owner password to decrypt the file (Not available for AppendPDF & AppendPDF Pro)
If a PDF file already has encryption set and you wish to change the settings or remove encryption (APCrypt/SecurSign only), you need to supply the owner password in order to make changes to the file.
Document Permissions
-noprint — Do not allow printing (optional)
Specifies that the document cannot be printed. When the document is opened, the print icon on the toolbar and the Print option under the file menu will be grayed out.
At the 128-bit and 256-bit encryption level there is also an option to allow low resolution printing only. See the section High-level encryption for more detail.
-nomodify — Do not allow modifying the document (optional)
Specifies that the document cannot be modified. You will not be able to modify text or pages in the document when this option is used. You can fill in form fields, or add notes or other annotations.
With -nomodify, the following tools are grayed out and cannot be used when the document is opened in Acrobat:
- Crop tool
- Movie tool
- Link tool
- Article tool
- Form tool
- Digital Signature tool
Text can be selected for copying but cannot be cut, pasted or cleared.
-nocopy — Do not allow copying text or graphics (optional)
Specifies text and graphics cannot be copied.
With -nocopy, the following tools are grayed out and cannot be used when the document is opened in Acrobat:
- Text Select tool
- Touch-Up Text tool
- Table/Formatted Text Select tool
-nonotes — Do not allow adding or changing notes or form fields (optional)
Specifies that annotations cannot be added or changed in the document. Annotations include notes, highlighted text, form fields and pencil marks. Annotations can be in text, graphic or audio format, or even attached external files.
With -nonotes, the following tools are grayed out and cannot be used when the document is opened in Acrobat:
- Notes tool
- Pencil tool
- Highlight Text tool
- Form tool
- Digital Signature tool
- Free Text tool
- Sound Attachment tool
- Stamp tool
- File Attachment
- Square tool
- Circle tool
- Line tool
-noaccess — Do not allow accessibility (optional)
Specifies content accessibility is not allowed. Content accessibility provides the vision and motion-challenged community with the tools and resources to make digital information more accessible. To learn more about content accessibility consult the Acrobat Help guide within Acrobat.
-nohighres — Do not allow high resolution printing (optional)
Specifies low resolution printing only. Acrobat prints each page as a low resolution (150 dpi) bitmap. The document cannot be recreated from these printouts.
-nofill — Do not allow filling form fields or signing fields
Specifies that no changes can be made to form fields or digital signature fields. This setting effectively prevents a filled-in form from being changed.
-noassembly — Do not allow document assembly
Specifies that no new pages can be added or removed from the PDF document. Also prevents rotating pages in the document. Effectively prevents pages being removed from the PDF document to be used elsewhere.
Permissions Allowed with 40-bit Encyption
The table below shows how the software application security options correspond to Acrobat’s security restrictions. The “Changes Allowed” column below lists the features still available after the document is secured.
| Option | Restrictions Set (Not Allowed) |
Changes Allowed |
|---|---|---|
| -nocopy | Content Copying or Extraction Content Accessibility |
|
| -noprint | Printing | |
| -nomodify -nonotes |
Changing the Document Document Assembly Authoring Comments and Form Fields Form Field Fill-in or Signing |
None |
| -nomodify | Changing the Document Document Assembly |
Commenting, filling in form fields, and signing |
| -nonotes | Authoring Comments and Form Fields | Page layout, filling in form fields, and signing |
| none | Any except extracting pages |
Permissions Allowed with 128-bit or 256-bit Encryption
Acrobat accepts certain combinations of the “Changes Allowed” options. The Changes Allowed options are:
- -nomodify — Do Not Allow Modifying the Document
- -noassembly — Do Not Allow Document Assembly
- -nonotes — Do Not Allow Adding or Changing Notes or Form Fields
- -nofill — Do Not Allow Filling In or Signing of Form Fields
The table below shows security options vs. restrictions set with high level encryption. These combinations are discussed below.
| Option | Restrictions Set (Not Allowed) |
|---|---|
| -noaccess | Content Accessibility |
| -nocopy | Content Copying or Extraction |
| -noprint | Printing |
| -nohighres | Only Low Resolution Printing is allowed |
| -nomodify -nonotes -nofill -noassembly |
Changing the Document Authoring Comments and Form Fields Form Field Fill-in or Signing Document Assembly |
| -nomodify -nonotes -nofill |
Changing the Document Authoring Comments and Form Fields Form Field Fill-in or Signing |
| -nomodify -nonotes -noassembly |
Changing the Document Authoring Comments and Form Fields Document Assembly |
| -nomodify -noassembly |
Changing the Document Document Assembly |
| none |
Allow no changes with -nomodify -noassembly -nonotes -nofill
Turning off all changes means: do not allow document modification (-nomodify), do not allow document assembly (-noassembly), do not allow the adding or changing of notes or form fields (-nonotes) and do not allow the fill-in or signing of form fields (-nofill). These options must all be used together for this setting to be made.
Allow inserting, deleting, and rotating pages with -nomodify -nonotes -nofill
This setting only allows document assembly.
These options specify: do not allow document modification (-nomodify), do not allow the adding or changing of notes or form fields (-nonotes) and do not allow the fill-in or signing of form fields (-nofill).
Allow filling in form fields, and signing with -nomodify -noassembly -nonotes
This setting only allows form field fill-in or signing.
These options specify: do not allow document modification (-nomodify), do not allow document assembly (-noassembly), and do not allow the adding or changing of notes or form fields (-nonotes).
Allow commenting, filling in form fields, and signing with -nomodify -noassembly
This setting allows the adding or changing of notes or form fields and the fill-in or signing of form fields.
These options specify: do not allow document modification (-nomodify), and do not allow document assembly (-noassembly).
Allow any except extracting pages with no options
If you don’t use any Changes Allowed options, Acrobat will allow any changes except extracting pages.
Verifying Security Features
To view the current security settings:
| Acrobat X, XI and DC | Select File > Properties. Click the Security tab, then click the Show Details… button. |
|---|
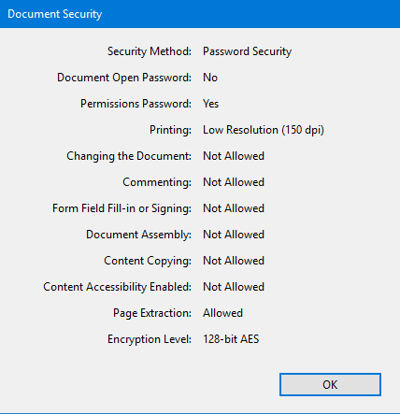
In the example shown below, both a User password and an Owner password are set, only low resolution printing is allowed, changing the document, content copying and extraction, authoring comments and form fields, and form field fill-in or signing are not allowed, content accessibility and document assembly are allowed and encryption is 128-bit.
Security Features in SecurSign 5.0
Apply 128-bit AES or 256-bit AES encryption to PDF documents; the latest and most secure Adobe Acrobat standard encryption mechanism, fully compatible with Adobe Acrobat 9.x and Above
Utilize PDFs as secure envelopes; apply 256-bit AES security to PDF and non-PDF file attachments while leaving the PDF itself unencrypted.
-rc4: Encrypt using the RC4 cryptography algorithm
-aes: Encrypt using the AES cryptography algorithm
-keylength <int>: Key Length. Valid options are 40, 128 & 256. Default is 128.
If a file has been encrypted with AES 256, the file will open under Acrobat 9 and Above. When viewing the Document Information on a file that is set with AES 256 encryption, the PDF Version will be set as 1.7, Adobe Extension Level 3.
-onlyattach: Encrypt attachments only using AES. –onlyattach also requires the following flags on the command line: –userpass <Password>, -ownerpass <Password>, -aes –keylength 128 or 256
Digital Signature Options
Introduction to Digital Signatures
This chapter discusses digital signatures and how to apply them to PDF documents.
- About Digital Signatures provides an overview of digital signatures and explains what you can do with them in SecurSign.
- Options for Digital Signatures describes the options for applying digital signatures.
About Digital Signatures
A digital signature is an encrypted message digest — a set of characters that is mathematically generated based on the document being signed, and then encrypted with a private key that belongs to the signer. The digital signature serves two functions. As with a conventional signature, it uniquely identifies the signer. In addition, it indicates whether the document has been modified since it was signed.
Types of digital signatures
You can create two different types of digital signatures on PDF documents using SecurSign:
- An invisible, or blind, signature cannot be seen in the pages of the document. It is only viewable in the Signatures pane as a list of information about the signature. That information includes the signer’s name, time of signing, signature validity, reason for signing, location of signing, document revision number, and signing method. (See the figure below.)
- A visible signature, or signature with appearances, is displayed in the document, as well as in the Signatures pane. The portion that is displayed in the document has two parts: a seal and signature text. (See the examples below.)
— The seal is a graphic, such as a company logo or a scanned handwritten signature.
— The signature text is a representation of the information in the Signatures pane.
What you can do with digital signatures
With SecurSign, you can programmatically apply a visible or invisible signature to your documents. For visible signatures, a default seal is supplied; however, any graphic is acceptable for the seal, as long as it is in PDF format (see Creating a Custom Seal). You can apply a visible signature to any existing field in the document (it does not have to be a signature field), or you can create a new signature field anywhere in the document and apply a signature to it simultaneously or at a later time. Whether you use an existing field or create a new one, the seal will scale to fit the field.
Options for Digital Signatures
This section describes the options for digitally signing documents. In addition to the options described here, you can also use the general options discussed in General Options – SecurSign when you apply a digital signature.
Note: You cannot use the standard security, or encryption, options at the same time you are using the digital signature options. If you plan to use SecurSign for encryption and signing, you must encrypt the document first, and then sign it in a separate process. Do not perform the steps in the reverse order. Encrypting a document after it has been signed corrupts the digital signatures.
Command syntax
$ secursign [options] [-o outFilePath] inPDFFile
Options for digital signatures — summary
| Type | Options | Parameter | Description |
|---|---|---|---|
| All Signatures | -sign | Apply a digital signature (default) | |
| -keypath | <string> | Path to PKCS#12 file | |
| -keypass | <string> | Password to access key (password to PKCS#12 file) | |
| -name | <string> | Name of the signer of the PDF document | |
| -reason | <string> | Reason for signing the file | |
| -location | <string> | Geographical location of the sign in | |
| -pdfa | Support the signing of PDF/A documents while retaining PDF/A conformance | ||
| -d | <string> | Owner password to decrypt the file | |
| -verify | Verify digital signatures on the given PDF document | ||
| -printcert | Print certificate information during signature verification | ||
| Visible Signatures/ New Signature Fields |
-addfieldonly | Add signature field to document without signing. | |
| -newsignfield | <string> | Name of new signature field to create. | |
| -page | <int> | Page number on which to add new signature field. | |
| -top | <int> | New signature field position-top. | |
| -left | <int> | New signature field position-left. | |
| -bottom | <int> | New signature field position-bottom. | |
| -right | <int> | New signature field position-right. | |
| -f | <string> | Name of existing field to be signed. | |
| -seal | <string> | Path to source page containing signature seal. | |
| -sealpage | <int> | The page in the file identified with -seal on which appears the graphics to be used for the seal. | |
| -font | <string> | Name of font to be used to draw signature information on the page | |
| -listfonts | Print a list of the fonts available in the appligent_home fonts directory | ||
| -fontsize | <int> | Font size of signature text. | |
| -offset | <int> | Signature text offset from left edge of signature rectangle, from 0% to 100%. Default=50%. |
Options for all signatures — detailed
-sign — Apply a digital signature (default)
Tells SecurSign to apply a digital signature in accordance with the remaining options on the command line. You can use the -sign option to apply an invisible signature to a document, to apply a visible signature in an existing field, or to simultaneously create a new field and apply a visible signature to it.
- When applying a visible signature to an existing field, you must specify the -f option to identify the field.
- When creating a new field and applying a visible signature to it, you must specify the -newsigfield, -top, -left, -bottom, and -right options to name and position the field.
- The following additional options are required for all types of signature applications: -keypath, -keypass, -name, -location, and -reason. The -d option is required for signing encrypted documents only.
-keypath <string> — Path to key location; required for signing
Path name of the digital ID certificate file that contains the signer’s key. SecurSign supports PKCS#12 certificate files. These files usually have a .p12 extension (such as my_cert.p12) or a .pfx extension (such as my_cert.pfx).
-keypass <string> — Password to access key (password to PKCS#12 file); required for signing
Password associated with the PKCS#12 certificate file. This password must be specified to use the file.
-name <string> — Name of the signer of the PDF file; required for signing
Name of the signer of the document. In most cases this is the signer’s first and last name. If the name includes spaces, it must be enclosed in quotes.
Note: If you do not specify a name using this option, the visible signature will not include a name. SecurSign does not use the name on the certificate as a default for the visible signature.
-reason <string> — Reason for signing the file; required for signing
Reason for signing the file. This can be kept short, for instance, “Company security requirement.”
Note: If the reason includes spaces, the reason text must be enclosed in quotes. Quotes can be escaped with a ‘\’ character.
-location <string> — Geographical location of the signing; required for signing
Where the signing took place. In the United States, this may be kept to city, state, and country (for example, “Lansdowne, PA, USA”). In other countries, enough detail should be included so that readers of the document will understand where it is from (for example, “Paris, France” or “Erdington, West Midlands, England”). If the location includes spaces, it must be enclosed in quotes.
-pdfa — Support PDF/A documents
PDF/A documents can be digitally signed while retaining conformance for PDF/A.
-d <string> — Owner password of encrypted input file; required if input file is encrypted
The current Owner password of a document that is already encrypted. Supplying the Owner password enables you to add or change encryption options.
-verify — Verify digital signatures on the given PDF document
Determine the integrity of all of the digital signatures applied to the PDF document. Also, determine if the file has been modified by appending information to the end of the file after the document has been digitally signed. Any problems found write information to the log and return a non-zero result in the status.
-printcert — Print certificate information during signature verification
Detailed digital signature data along with certificate information is printed to the console during signature verification.
Options for visible signatures / new signature fields — detailed
-addfieldonly — Add signature field to document without signing
Instructs SecurSign to add a signature field to a document. You can use this option to create a new signature field, but you cannot use it to simultaneously create and sign a new signature field. If you specify the -addfieldonly option, you must also specify the -newsigfield, -top, -left, -bottom, and -right options to name and position the field.
-newsigfield <string> — Name of new signature field
Name of a new signature field to be created in a document. You can use the -newsigfield option with the -sign option to simultaneously create the field and apply a visible signature to it, or with the -addfieldonly option to just create the field for signing at a later time. If you specify the -newsigfield option, you must also specify the -top, -left, -bottom, and -right options to position the field.
-page <int> — Page number on which to add new signature field (default=1)
Number of the page on which you want to add a new signature field. If you specify the -page option, you must also specify the -newsigfield, -top, -left, -bottom, and -right options.
-top <int> — New signature field position — top; required with -newsigfield
Location of the top of a new rectangular signature field, measured from the bottom of the uncropped page. Specify the location as a floating-point decimal measured in points, for example, 115, 115.2, or 115.25. If you specify the -top option, you must also specify the -newsigfield, -left, -bottom, and -right options. The figure below shows the -top, -left, -bottom, and -right options for a signature field positioned on an 8-1/2 x 11-inch page.
-left <int> — New signature field position — left; required with -newsigfield
Location of the left side of a new rectangular signature field, measured from the left side of the uncropped page. Specify the location as a floating-point decimal measured in points, for example, 90, 90.4, or 90.45. If you specify the -left option, you must also specify the -newsigfield, -top, -bottom, and -right options. (See the figure below.)
-bottom <int> — New signature field position — bottom; required with -newsigfield
Location of the bottom of a new rectangular signature field, measured from the bottom of the uncropped page. Specify the location as a floating-point decimal measured in points, for example, 20, 20.1, or 20.15. If you specify the -bottom option, you must also specify the -newsigfield, -top, -left, and -right options. (See the figure below.)
-right <int> — New signature field position — right; required with -newsigfield
Location of the right side of a new rectangular signature field, measured from the left side of the uncropped page. Specify the location as a floating-point decimal measured in points, for example, 440, 440.3, or 440.35. If you specify the -right option, you must also specify the -newsigfield, -top, -left, and -bottom options. (See the figure below).

-f <string> — Name of existing field to be signed
Name of an existing field in which to place a visible signature. You can use any existing form field in the document. It doesn’t have to be a signature field.
-seal <string> — Path to PDF document containing signature seal (default=default_seal.pdf)

Path name of the PDF file containing the seal to be used for a visible signature. The file must be in PDF format. If you do not specify the -seal option, default_seal.pdf will be used. The default-seal.pdf file supplied with SecurSign is shown to the right. You can replace this file with your own seal file named default_seal.pdf.
-sealpage <int> — Source page containing signature seal (default=1)
Page on which the seal for a visible signature is located in the file named with the -seal option. If you specify the -sealpage option, you must also specify the -seal option.
-font <string> — Font to be used to draw Digital Signature appearance
You have the ability to specify an OpenType font when signing a document. The fonts need to be placed into the Font directory located in the appligent_home directory. On Windows, the location is C:\Documents and Settings\All Users\Application Data\Appligent\APDFLX.X.X\Resource\Font. On Unix the location is /usr/local/appligent/APDFLX.X.X/Resource/Font. Any number of additional fonts can be placed in the appligent_home directory. Use the -listfonts command to determine the proper font name.
-listfonts — Print a list of available font located in the appligent_home directory
Font names are not always the name of the file. -listfonts will return a list of all available fonts SecurSign can use that are located in the appligent_home directory.
-fontsize <int> — Font size of signature text (default=12)
Font size, in points, of the signature text that is part of a visible signature. This includes the text specified in the -name, -reason, and -location options, as well as the date and time of signing.
-offset <int> — Signature text offset from left edge of signature rectangle (default=50)
Distance between the left edge of the signature field and the left edge of the signature text, specified as a percent of the field length. You may specify an integer value from 0 to 100 (the default is 50). For example, if the field length is 280 points and the -offset is 50, the signature text starts 140 points from the left edge of the field.
Applying Digital Signatures
Introduction
This chapter discusses how to apply digital signatures to PDF documents. For an introduction to digital signatures and detailed information on the options, see Digital Signature Options.
- Preliminary Steps tells you what you need to know to obtain a digital ID and create a visible signature seal.
- Applying an Invisible Signature explains how to apply an invisible signature to a PDF document.
- Creating a New Signature Field tells you how to add a new signature field to a document.
- Placing a Visible Signature in an Existing Field shows you how to add a visible signature to an existing field in your document.
- Placing a Visible Signature in a New Field shows you how to simultaneously create a new field and place a visible signature in it.
Preliminary Steps
Before you can sign a document with SecurSign, you must have a digital ID file. In addition, if you want to use a custom seal for a visible signature, you must convert your graphic to PDF format.
Creating a digital ID file
SecurSign uses the information in a PKCS#12 digital ID file to apply your signature to a PDF document. A PKCS#12 file is a standard format that contains two parts: the signer’s private key and a digital certificate.
- The private key is used to encrypt the message digest when the signature is created. (For more information, see About Digital Signatures.)
- The digital certificate includes a corresponding public key that is used by the recipient to decrypt the message digest, as well as information about you, the signer.
Creating a PKCS#12 digital ID file is a two-step process.
- Obtain a digital certificate from a third-party certificate authority by following the directions on their website. The following vendors supply digital certificates known to work with Acrobat:VeriSign www.verisign.com
Thawte www.thawte.com
GlobalSign www.globalsign.comSecurSign will work with any X.509 version 3 digital certificate with a 1024 or 2048-bit key-length. Several digital ID classes are offered by the certificate authorities. A personal digital certificate, also called a personal ID or a Class 1 Digital ID, is typically used to sign emails and is appropriate for signing PDF documents with SecurSign. - Export the digital certificate from your web browser to create the PKCS#12 digital ID file.
Exporting Certificates for use with SecurSign
If you’ve acquire a digital certificate from a certificate authority, you need to export the certificate so it may be used with SecurSign.
Using Internet Explorer
Select Tools > Internet Options. Then select the Content tab and click the Certificates button. Find your certificate in the list, select it, click the Export button, and follow the instructions in the Certificate Export Wizard.) By default, the digital ID file will have a .pfx extension on a Windows system.
Using FireFox (Windows)
Select Tools > Options > Advanced tab > Encryption tab. Click the View Certificates button. Select “Your Certificates” tab. Select your certificate and click “Export”. Accept the default file type (PKCS#12).
Note: If you are evaluating SecurSign and don’t require a high degree of security for testing purposes, a simpler option is to create a self-signed digital ID instead of going through a certificate authority. See the online help in Adobe Acrobat or Adobe Reader for instructions.
Creating a custom seal
If you plan to use a custom seal for your visible signature, it must be in PDF format. Most common graphic formats, such as TIFF, GIF, and JPEG can be easily converted to PDF using Adobe Acrobat or a similar tool.
Two methods are available for converting graphics to PDF format:
- Drag the file onto the Acrobat icon (Windows and Macintosh) or into an open Acrobat window (Windows).
- In Acrobat XI & DC select File > Create > PDF from File.
Before using any PDF file for a custom seal, make sure it is not cropped. Cropped seal files do not display correctly.
- In Acrobat XI & DC, select Tools Pane on right side of Screen > Pages > Crop. Shortcut for opening Window is Ctrl + Shift + T
In order to use a seal from an existing PDF file, it’s necessary to first crop the page to the desired dimensions for the seal and then.
For more information on file conversion and page cropping, see the Adobe Acrobat online help.
Applying an Invisible Signature
The following example command applies an invisible signature to a document. The sample input file, securitysample1.pdf, is supplied with SecurSign. It is located in the samples directory where SecurSign is installed.
Command
$ secursign -sign -keypath pathname\my_key.pfx -keypass mykeypass -name "Al North" -location "London, England" -reason "Security Policy" -o pathname\SignedSampleBlind.pdf pathname\samples\securitysample1.pdf
Explanation
The -sign option instructs SecurSign to apply a signature to the input file, securitysample1.pdf, according to the remaining options. Note that quotes are used to enclose values containing spaces.
| Option | Value | Explanation |
|---|---|---|
| -sign | Instructs SecurSign to apply a signature. (Because -sign is the default, it can be omitted.) | |
| -keypath | my_key.pfx | Digital ID file used to sign the document. |
| -keypass | mykeypass | Password required to access the digital ID file. |
| -name | “Al North” | Name of the person signing the document. |
| -location | “London, England” | Location of the document signing. |
| -reason | “Company Policy” | Reason for signing the document. |
| -o | SignedSampleBlind.pdf | Output file where the results are saved. |
Result
When the command is executed, an invisible signature is applied to the input file, securitysample1.pdf. The signature may be viewed in the Signatures pane of the output file, SignedSampleBlind.pdf. The input file is not changed.
Creating a New Signature Field
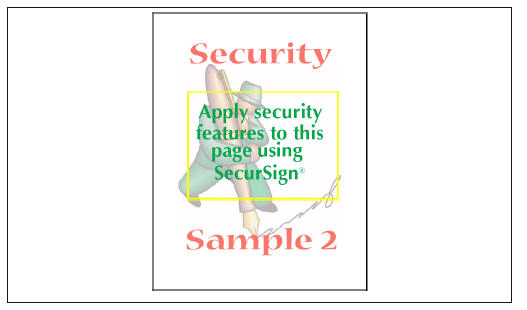
This example command creates a new signature field in a document that has none. A signature can be applied to the field at a later time, as described in Placing a Visible Signature in a Existing Field. The sample input file, securitysample2.pdf, is supplied with SecurSign (see the figure below). It is located in the samples directory where SecurSign is installed.
Command
$ secursign -addfieldonly -newsigfield mysignfield -left 300 -right 600 -top 100 -bottom 10 -o pathname\NewSignatureFieldSample.pdf pathname\samples\securitysample2.pdf
Explanation
The -addfieldonly option instructs SecurSign to create a new signature field in securitysample2.pdf, and save it to NewSignatureFieldSample.pdf according to the remaining options.
| Option | Value | Explanation |
|---|---|---|
| -addfieldonly | Instructs SecurSign to create a new signature field with no signature in it. | |
| -newsigfield | mysignfield | Name of signature field to be created. |
| -left | 300 | Left side of signature field positioned 300 points from left side of uncropped page. |
| -right | 600 | Right side of signature field positioned 600 points from left side of uncropped page. |
| -top | 100 | Top of signature field positioned 100 points from bottom of uncropped page. |
| -bottom | 10 | Bottom of signature field positioned 10 points from bottom of uncropped page. |
| -o | NewSignatureFieldSample.pdf | Output file where the results are saved. |
Result
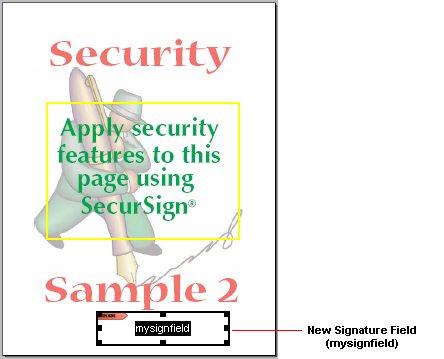
When the command is executed, a new signature field, named mysignfield, is saved in NewSignatureFieldSample.pdf (see the figure below).
Placing a Visible Signature in an Existing Field
This example command applies a visible signature to an existing field in a document. The sample input file, securitysample3.pdf, and the seal, default_seal.pdf, are supplied with SecurSign. They are located in the samples directory where SecurSign is installed. The input file contains a signature field, as shown in the figure below.
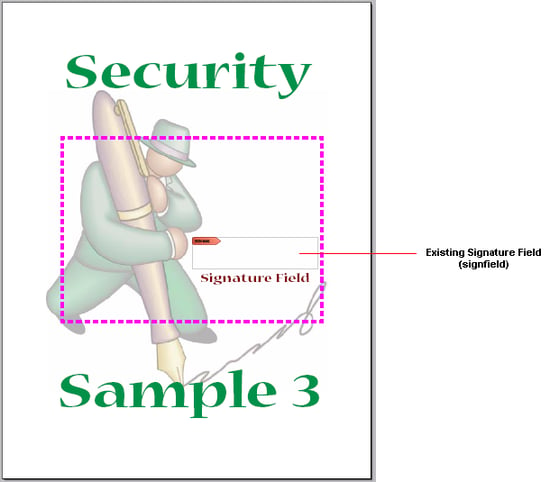
Command
$ secursign -sign -keypath pathname\my_key.pfx -keypass mykeypass -name "Beth Anderson" -location "San Francisco, CA, USA" -reason "Company Policy" -f signfield -fontsize 8 -offset 22 -o pathname\SignedSample3.pdf pathname\samples\securitysample3.pdf
Explanation
The -sign option instructs SecurSign to apply a signature to the field named signfield in securitysample3.pdf, and save it to SignedSample3.pdf according to the remaining options. Note that quotes are used to enclose values containing spaces.
| Option | Value | Explanation |
|---|---|---|
| -sign | Instructs SecurSign to apply a signature. (Because -sign is the default, it can be omitted.) | |
| -keypath | my_key.pfx | Digital ID file used to sign the document. |
| -keypass | mykeypass | Password required to access the digital ID file. |
| -name | “Beth Anderson” | Name of person signing the document. |
| -location | “San Francisco, CA, USA” | Location of the document signing. |
| -reason | “Company Policy” | Reason for signing the document. |
| -f | signfield | Name of field to sign. |
| -fontsize | 8 | Font size of signature text set to 8 points. |
| -offset | 22 | Signature text offset 22% from left edge of signature rectangle. |
| -o | SignedSample3.pdf | Output file where the results are saved. |
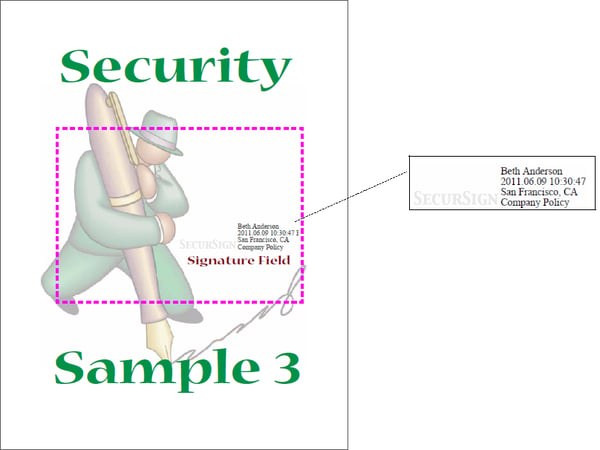
Result
When the command is executed, securitysample3.pdf is saved as SignedSample3.pdf with a visible signature in the field named signfield, as shown in the figure below. (The signature information is also displayed in the Signatures pane.) The -seal option is not specified, so the default graphic, default_seal.pdf, is used. SecurSign scales the seal to fit the field. For this specific signature field, a reduced -offset of 22 (default=50) and -fontsize of 8 (default=12) ensure that the signature text fits in the signature field.
Placing a Visible Signature in a New Field
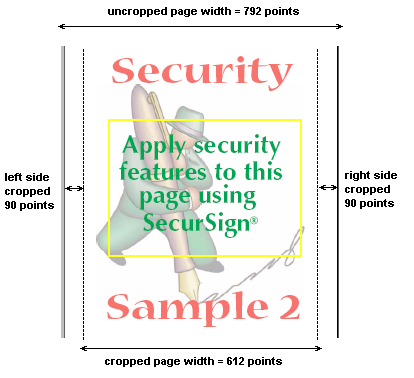
Example 1 — A cropped document
This command simultaneously creates a new field on a cropped page and places a visible signature in the field. The sample input file, securitysample2.pdf, and the default_seal.pdf, are supplied with SecurSign.
If you examine the page cropping of securitysample2.pdf (Document > Crop Pages in Acrobat 9 or Tools > Pages > Crop in Acrobat X), you will see that the left and right sides are cropped by 90 points, or 1.25 inches, as shown in the figure below. This cropping must be taken into account when creating a signature field, because while SecurSign positions the field from the bottom-left of the uncropped page, Adobe Acrobat displays only the cropped portion of the page.
Note: Adobe Acrobat refers to the cropped page as the “CropBox”.
Command
$ secursign -sign -keypath pathname\my_key.pfx -keypass mykeypass -name "Frieda Jones" -location "Topeka, Kansas, USA" -reason "Document Safety" -seal pathname\default_seal.pdf -newsigfield signfield2 -left 100 -right 410 -top 100 -bottom 10 -offset 28 -fontsize 11 -o pathname\SignedSample2.pdf pathname\samples\securitysample2.pdf
Explanation
The -sign option instructs SecurSign to apply a signature to the input file, securitysample2.pdf, according to the remaining options. Note that quotes are used to enclose values containing spaces.
| Option | Value | Explanation |
|---|---|---|
| -keypath | my_key.pfx | Digital ID file used to sign the document. |
| -keypass | mykeypass | Password required to access the digital ID file. |
| -name | “Frieda Jones” | Name of person signing the document. |
| -location | “Topeka, Kansas, USA” | Location of the document signing. |
| -reason | “Document Safety” | Reason for signing the document. |
| -seal | default_seal.pdf | File that contains the signature seal. |
| -newsignfield | signfield2 | Name of signature field to be created and signed for this example. |
| -left | 100 | Left side of signature field positioned 100 points from left side of uncropped page. |
| -right | 410 | Right side of signature field positioned 410 points from left side of uncropped page. |
| -top | 100 | Top of signature field positioned 100 points from bottom of uncropped page. |
| -bottom | 10 | Bottom of signature field positioned 10 points from bottom of uncropped page. |
| -offset | 28 | Signature text offset 28% from left edge of signature rectangle. |
| -fontsize | 11 | Font size of signature text to 11 points. |
| -o | SignedSample2.pdf | Output file where the results are saved. |
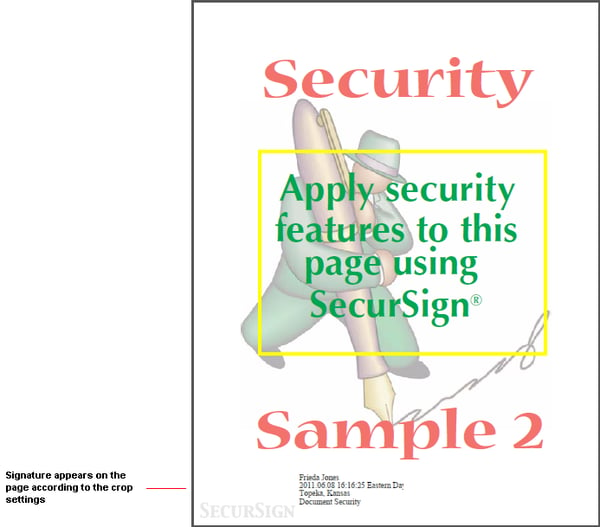
Result
After the command is executed, securitysample2.pdf is saved as SignedSample2.pdf with a visible signature in a newly created signature field called signfield2 (see the figure below). The left side of the signature field appears to be positioned 10 points from the left side of the page, even though the value of the -left option is 100 points. That is because the page is cropped by 90 points on the left, and only the cropped area is displayed in Acrobat. The seal, default_seal.pdf, measures 420 x 520 points. It is reduced to fit in the signature field, signfield2, which measures 310 x 90 points. The signature text is forced to the right edge of the seal with an offset of 28%.
Example 2 — A seal with wide margins
This example command simultaneously creates a new field and places a visible signature in the field. The sample document, securitysample1.pdf, and the seal, sig.pdf, are supplied with SecurSign. They are located in the samples directory where SecurSign is installed.
The seal is a handwritten signature with wide margins around it, as shown in the figure below.
Command
$ secursign -sign -keypath pathname\my_key.pfx -keypass mykeypass -name "Jack Frost" -location "Buffalo, NY, USA" -reason "Secure Transmission" -seal pathname\samples\sig.pdf -newsigfield signfield1 -left 435 -right 690 -top 105 -bottom 0 -offset 15 -fontsize 11 -o pathname\SignedSample1.pdf pathname\samples\securitysample1.pdf
Explanation
The -sign option instructs SecurSign to apply a signature to the input file, securitysample1.pdf, according to the remaining options. Note that quotes are used to enclose values containing spaces.
| Option | Value | Explanation |
|---|---|---|
| -sign | Instructs SecurSign to apply a signature. (Because -sign is the default, it could be omitted.) | |
| -keypath | my_key.pfx | Digital ID file used to sign the document. |
| -keypass | mykeypass | Password required to access the digital ID file. |
| -name | “Jack Frost” | Name of person signing the document. |
| -location | “Buffalo, NY, USA” | Location of the document signing. |
| -reason | “Secure Transmission” | Reason for signing the document. |
| -seal | sig.pdf | File that contains the signature seal. |
| -newsignfield | signfield1 | Name of signature field to be created. |
| -left | 435 | Left side of signature field positioned 435 points from left side of uncropped page. |
| -right | 690 | Right side of signature field positioned 690 points from left side of uncropped page. |
| -top | 105 | Top of signature field positioned 105 points from bottom of uncropped page. |
| -bottom | 0 | Bottom of signature field positioned 0 points from bottom of uncropped page. Because the seal has a wide bottom margin that is the same color as the page, it will not appear to touch the bottom of the page in spite of the 0 setting. |
| -offset | 15 | Signature text offset 15% from left edge of signature rectangle. |
| -fontsize | 11 | Font size of signature text to 11 points. |
| -o | SignedSample1.pdf | Output file where the results are saved. |
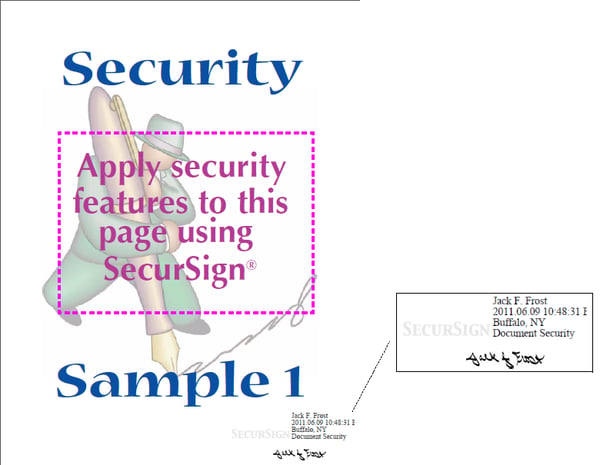
Result
After the command is executed, securitysample1.pdf is saved as SignedSample1.pdf with a visible signature in a newly created signature field called signfield1. (The signature information is also displayed in the Signatures pane.) The seal, sig.pdf, measures 225 x 80 points. It does not have to be scaled to fit in the 255 x 105 point signature field. The signature text is forced over the top margin of the seal with an offset of 15%. (When using a seal without a top margin, you can achieve the same effect by increasing the height of the field.)
Convert from inches to points
All measurements in SecurSign are in points. If you are converting from inches, 1 inch is equivalent to 72 points, and an 8-1/2 x 11 inch page is equivalent to 612 x 792 points. The following table contains some common conversions.
| Inches | Points |
|---|---|
| 0.11 | 8 |
| 0.167 | 12 |
| 0.5 | 36 |
| 0.75 | 54 |
| 1.0 | 72 |
| 1.5 | 108 |
| 2.0 | 144 |
Use the correct measurements for the graphic seal
Open the seal in Adobe Acrobat or Adobe Reader and find its cropped page size. In Acrobat, move your mouse over the bottom-left corner of the document window.
This is the measurement SecurSign uses when fitting the seal into a field. If you open the image in a graphics application, you might see a different size. Do not use it for your calculations. Use the cropped page size shown in Acrobat or Reader.
Understand how SecurSign scales signature seals
SecurSign reduces the seal size if at least one dimension of the field in which it is being placed (horizontal or vertical) is smaller than the corresponding dimension of the seal. For example, when a 300 x 150 point seal is placed in a 400 x 100 point field, the seal is proportionally scaled to 200 x 100 points.
SecurSign increases the seal size if both dimensions of the field (horizontal and vertical) in which it is being placed are larger than the corresponding dimensions of the seal. For example, if a seal that’s 100 x 150 points is placed in a field that’s 200 x 400 points, the seal is proportionally scaled to 200 x 300 points.
Verifying Digital Signatures
Managing Digital ID Certificates
It’s not necessary to “trust” the signer of a digitally-signed document in order to verify that the document has not been tampered. Digital signatures will reveal tampering regardless of whether the certificate used to sign the file remains valid at the time it’s checked.
However, if you need to verify that the signer remains authorized and their certificate is still valid, you’ll need to add their certificate to your list of trusted certificates.
Each desktop application has a distinct method for adding and managing digital ID certificates. In Adobe Acrobat X & XI, you’ll find “Manage Trusted Identities” under the Tools pane in the Sign & Certify section. In Adobe Reader X & XI, you’ll find “Manage Trusted Identities” under the “Edit” menu in Protection > Manage Trusted Identities.
If you use other desktop software for viewing digitally-signed PDF documents, you’ll need to find the equivalent functionality in that application in order to manage trusted identities.
How to Verify Digital Signatures
Digital signatures serve two distinct purposes in PDF documents.
- To ensure the document hasn’t been altered since it was signed.
- To verify that the signing credentials of the person (or entity) signing the document remain in effect.
While SecurSign provides these functions on a server, most users experience digital signatures on the desktop when they use digital-signature-aware software such as Adobe Acrobat or Reader to open digitally-signed PDF files. Here we provide some basic information on how to understand digital signature messages in Adobe Acrobat X or Reader X.
Note: This information is not intended to serve as a substitute for desktop software product documentation. Even Adobe’s interface for digital signatures has evolved over time. Other digital-signature-aware applications should provide similar messages in similar circumstances.
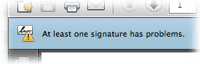
When a user first encounters a digitally-signed PDF file they may see one of two types of messages:
| Self-signed documents:
|
Trusted Documents:
|

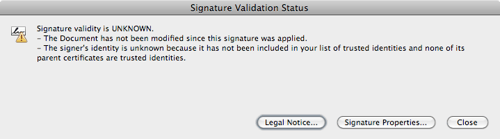
If the PDF was signed by a user with a self-signed certificate, it’s possible to verify that the file was not altered since signing, but it is not possible to ascertain whether or not the signer remains authorized to sign the document.
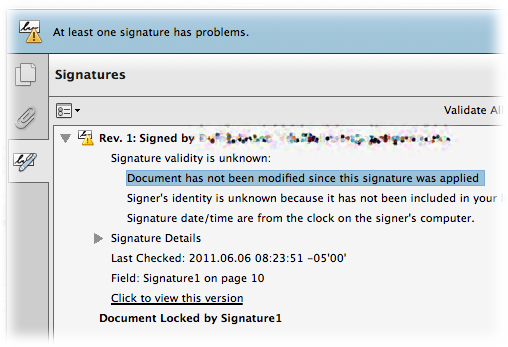
Verifying Self-Signed Documents
Even though you may see a message indicating that “at least one signature has problems” most users simply want to know whether the document has been tampered. It is still possible to verify that a self-signed PDF document has not been tampered since it was signed.
Open the Signature panel and review the signature details. If the document remains unmodified, you’ll see something like the following:
Verifying Documents Signed by a Trusted Entity
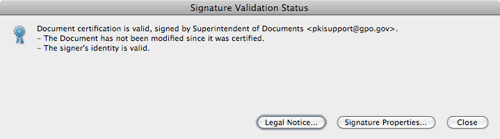
If the PDF was signed by a user you’ve accepted as a “trusted identity”, it’s possible to check the signature for current validity (ie, to know whether the signing certificate has been revoked or not). This is also true if the PDF was signed by a user who is trusted by your software as a function of the signer’s Certificate Authority (CA) chain.
In such cases, you’ll open the signature panel to see something like this:
Digital Signature Fields
Another method of verifying digital signatures is to simply click on the signed digital signature field. Depending on whether the document is self-signed or signed by a verifiable certificate, the user will receive different messages. The following messages are encountered in Adobe Reader X:
| Self-Signed Documents:
|
| Trusted Documents
|
Note that in both cases (self-signed and certificate-signed), it’s possible to determine whether or not the document has been tampered.
If any changes are made to the document following verification, Adobe Acrobat, Reader or other digital-signature-aware software will report that the document has been modified since it was signed.
Unattended
SecurSign within a Document Processing and Delivery Solution
As SecurSign is server-based and command-line driven, it can be used efficiently within a script or program that processes large volumes of PDF documents in an unattended environment. These documents may be installed on a web server, an interoffice file server, or some other public server where maintaining security is important.
Adding security to a document should generally be the last step of processing. Appligent has available several products for processing PDF documents. Any of these, or a combination, could be used before applying security features with SecurSign. The products available are as follows:
- AppendPDF Pro — Append several PDF documents or pages of documents together to produce one complete document. Add a cover page and a table of contents, as well as text stamps to any of the pages.
- FDFMerge — Merge PDF forms together with FDF or XFDF data files to create a completed form. With FDFMerge’s form-flattening feature, form fields are removed, making the output document more portable and less easily modified.
- StampPDF Batch — Add text to PDF documents as headers or footers, watermarks, etc. Stamps can be page numbers, date/time, filenames — in any RGB/CMYK color or grayscale, Adobe PostScript Type 1 font, point size, and/or position. Stamps can be overlaid or underlaid text, outline text, invisible text and/or multi-line.
Note: If you would like more information about these and other Appligent products, visit our Server Product page.
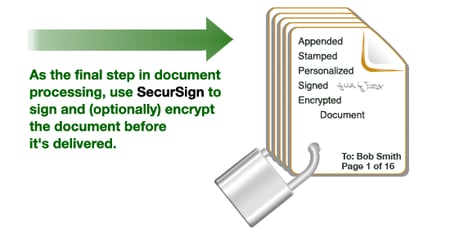
The figure below shows an example of using SecurSign as part of a document processing solution that uses AppendPDF and StampPDF Batch before using SecurSign to add security features. (The work done by AppendPDF and StampPDF Batch could also be done by using the single product AppendPDF Pro.) Once the document is secured, it is ready for delivery.

Using SecurSign in a Perl Script
Using SecurSign within a Perl script requires a simple system call. The following example uses Perl to call StampPDF and SecurSign:
system "stamppdf stampfile.txt file1.pdf"; system "secursign -encrypt -ownerpass owner -userpass user -keylength 40 -noprint -nomodify -nocopy -nonotes -o outfile1.pdf file1.pdf";
- The first system call calls StampPDF Batch, where the stamps specified in stampfile.txt are applied to the document file1.pdf
- The second system call calls SecurSign, where standard security features are applied to the document file1.pdf (do not allow printing, allow only form fill-in or signing). Owner and User passwords are set to owner and user, respectively.
SecurSign Command Line Introduction
Introduction
SecurSign is a command-line application. If you are used to the Microsoft Windows operating system, you may not be familiar with running command-line tools. This section shows you all you need to get started.
Windows
To run SecurSign in Windows, you need to open a Command Prompt window.
In Windows 7 or higher
- Click Start > Programs > Accessories > Command Prompt
The Command Prompt window opens.
Some basic commands
At the command prompt, you type each command, and press the Enter key to execute it. You can use the mouse to select text to copy or cut to the clipboard, but you cannot position the cursor with it. The command line is completely keyboard driven. Navigation keys are shown below:
| Key | Action |
|---|---|
| Backspace | Delete previous character |
| Right arrow | Move right one character |
| Left arrow | Move left one character |
| Up arrow | Recall previous command |
| Tab | File or directory name auto complete |
| Enter | Execute command |
In addition to running programs, you have many commands to navigate and maintain the system. Two important ones are cd and dir.
Changing directories
Use the cd command to change directories. For example, to change to the directory that SecurSign is located in, type:
C:\>cd \Appligent\SecurSign\
The command prompt changes to:
C:\Appligent\SecurSign>
to show you where you are.
To move back one level, use the shortcut of two periods (..)
C:\Appligent\SecurSign>cd..
Don’t forget to press the Enter key after every command. You will now be in this directory:
C:\Appligent>
Move back to SecurSign:
C:\Appligent>cd SecurSign
Listing the contents of a directory
Use the dir command to list the contents of a directory:
C:\Appligent\SecurSign>dir
The computer responds with a listing of all the contents of the SecurSign directory.
If the directory contents fly by too fast to read, do this:
C:\Appligent\SecurSign>dir /p
The /p switch tells DOS to display one page at a time. Press the Enter key to see the next page.
To see the contents of all the subdirectories at the same time, type:
C:\Appligent\SecurSign>dir /s
This displays the contents of SecurSign and all the subdirectories under it.
Running SecurSign
To run SecurSign, type the commands on the command line as shown in other sections of this manual and press Enter. For example:
$ secursign -o \files\output.pdf [options] samples\input.pdf
In this example, the dollar sign stands for the command prompt, a convention used throughout this manual. The command processes the input.pdf file using the options you provide, and then saves the results to output.pdf. Note that the relative path is included in the file specifications, so that SecurSign knows where to find the files. However, the safest way to specify files is to use the full path:
$ secursign -o c:\Appligent\SecurSign\files\output.pdf [options] c:\Appligent\SecurSign\samples\input.pdf
If you do not specify the correct path, you will get a “file not found” error.
Note: Each command must be typed on one line, even if it is presented on more than one line in the manual to fit on the page.
Now, refer to the rest of this User Guide for details about using SecurSign.
Troubleshooting
Tips for Working with SecurSign
If you are having trouble with the software, consult this list for a possible solution.
- Remember to decrypt documents that have security features already applied. If the documents you are working with already have some security features applied, they will need to be decrypted with -d <ownerpass> for SecurSign to use them.
- When using the log file option, -l <logfile>, be sure to give a log file name. If this is not done, SecurSign will recognize the text string immediately following the -l as the name of the log file. For example, if your command line is accidentally:
secursign -l -nomodify -nocopy -keylength 40 file.pdf
the log file will be called “-nomodify” and the correct encryption features will not be applied.
- Make sure all file and pathnames are correct. If you are working in one directory and SecurSign lives in another, you must account for that on your command line. This goes for all files, including input, output, log, keypath and seal files. The best practice is to use full paths for all files.
- If you get an error from SecurSign that the file was unable to write, check to make sure the file isn’t open in any other application. Also make sure you have write permissions in the directory and confirm the file is not read-only if you are trying to overwrite it.
- Only PDF documents can be secured. SecurSign will fail if you try to secure a document that is not a PDF document. Be particularly aware of this if you are using wildcards to specify filenames. You may wish to include the .pdf suffix in all wildcards, such as file*.pdf, *.pdf, etc.
- If you are encrypting a document, you must use the -encrypt option on the command line.
Cleaning Up PDF Documents
Not all PDF files are created equal. The way in which a PDF document is generated makes a difference, and PDFs generated by third party tools in particular can vary in quality. PDF documents can also become corrupted.
To check how the file was created:
- In Acrobat X, XI and DC select File > Properties… and click Description. Under Advanced, look at PDF Producer.
If the PDF Producer field is blank, consider the file suspect.
Making a Clean PDF
If you are having problems with a specific PDF, try to create “clean” version of your document. There are two ways of doing this using Adobe Acrobat. If you use other PDF manipulation software, check the documentation for functions that may be equivalent to those found in Adobe Acrobat.
Method 1: “Optimize” your PDF
- In Acrobat X, XI and DC > File Menu > Save As > Optimized PDF
If saving as optimized does not work, distill the document by following the steps below.
Method 2: Distilling PDF Documents
Distilling a document will remove all comments and form-fields from the PDF. If the PDF contains these items and you wish to preserve them, you must save them before Distilling.
To save existing comments
- In Acrobat X, XI and DC select Comments > Comments List > click the Options icon > Export All to Data File… In the Export Comments dialog box, select a name and location for the Forms Data File (.fdf), and click Save.
See the additional step below for saving form fields (if any):
Delete all comments:
- In Acrobat X, XI and DC select all the comments in the Comments List pane and press the Delete key.
To save form fields (if any):
- Save a copy of the original file. You will copy and paste the form fields from the original file into the new file after the distilling procedure.
Distilling the document
To distill a PDF document do the following:
- In Acrobat X and XI select File > Save As > More Options > PostScript. Choose a name and location for the file and click Save.
- In Acrobat DC select File > Export to > PostScript. Choose a name and location for the file and click Save
- Open Acrobat Distiller > select File > Open… In the Open PostScript File dialog, locate the PostScript file created in the previous step and click Open.
The distiller will create a new PDF file with the same name and location as the PostScript file.
Restoring comments
To restore the comments:
- In Acrobat X and XI, select Comments > Comments List > click the Options icon > Import Data File… In the Import Comments dialog box, locate the Forms Data File (.fdf) previously saved and click Select. In the next pop-up box, click Yes. The comments are restored.
- In Acrobat DC, select Tools > Comments > Comments List > click the Options icon > Import Data File…In the Import Comments dialog box, locate the Forms Data File (.fdf) previously saved and click Select. In the next pop-up box, click yes. The comments are restored
Restoring form fields
To restore form fields:
- Open the original PDF file that includes form fields.
- In Acrobat X and XI select Tools > Forms > Edit Form)
- In Acrobat DC > select Tools > Prepare Form > Form fields will automatically appear
- The form fields will appear, do a Control-A to select all the form fields.
- Open the new distilled PDF file which has no form fields.
- Do a Control-V to paste all the form fields onto the page.
You may need to reposition the fields by selecting them again with the Select Object Tool and moving them to the correct position. For multi-page forms you must do this for each page separately.
Support
Telephone & Fax
- Telephone: +1 610 284 4006
- Fax: +1 610 284 4233
A member of our friendly, knowledgeable support staff will reply as soon as possible, generally within one business day.
International Support
Customers from locations outside the United States, including Germany, United Kingdom, Canada and Australia can contact us directly or connect with one of our many resellers.
When contacting support please provide the following information:
- Name of the Product
- Product Version Number
- Operating System
- Your Name
- Company Name
- Your Email Address
- Your Phone Number
- Product Registration Number
- Any files to help us reproduce your problem (if needed)
SecurSign Readme
New Features
Please refer to the SecurSign User Guide for additional information.
SecurSign 5.0
2048-bit certificates are now supported.
You now have the ability to specify a font to use when signing a document. The fonts need to be placed in Font directory which can be found in the appligent_home directory. On Windows, the location is C:\Documents and Settings\All Users\Application Data\Appligent\APDFLX.X.X\Resource\Font. On Unix the location is /usr/local/appligent/APDFLX.X.XResource/Font. Font names are not always the name of the file. The option -listfonts will return a list of all available fonts SecurSign can use for signing a document.
-verify: Used to determine the integrity of all of the digital signatures applied to the PDF document. Also, determine if the file has been modified by appending information to the end of the file after the document has been digitally signed.
-printcert: Print Certificate Information during signature verification.
The default_seal.pdf no longer needs to be in the current working directory. You can place the default_seal.pdf in appligent_home, put it in the current working directory or specify on the command line the full path to where default_seal.pdf resides on your system.
SecurSign 4.0
Apply 128-bit AES or 256-bit AES encryption to PDF documents; the latest and most secure Adobe Acrobat standard encryption mechanism, fully compatible with Adobe Acrobat 9.x.
Utilize PDFs as secure envelopes; apply 256-bit AES security to PDF and non-PDF file attachments while leaving the PDF itself unencrypted.
-rc4: Encrypt using the RC4 cryptography algorithm
-aes: Encrypt using the AES cryptography algorithm
-keylength <int>: Key Length. Valid options are 40, 128 & 256. Default is 128.
If a file has been encrypted with AES 256, the file can only be opened under Acrobat 9 or you will receive the message “There was an error opening this document. Acrobat cannot decrypt the document”. When viewing the Document Information on a file that is set with AES 256 encryption, the PDF Version will be set as 1.7, Adobe Extension Level 3.
-onlyattach: Encrypt attachments only using AES. -onlyattach also requires the following flags on the command line: -userpass <Password>, -ownerpass <Password>, -aes –keylength 128 or 256
New Adobe PDF Library-Powered Features
-nomod: Retain current file modification date
-optimize: Combine -flate, -rascii, -nolzw, -optxobj, -optcontent and -optfonts
Please note: PDF files support the use of multiple types of compression simultaneously. Object level compression is a technique developed by Adobe to reduce the size of PDF files. Object level compression is used in addition to the other compression mechanisms used within the PDF file. Object level compression will reduce the file size typically by 2%. The limitation of Object level compression is, this compression mechanism is not always understood by older versions of Acrobat or third party PDF viewers or procession tools.
To use object level compression, use -comp. This flag will apply object level compression, typically reducing file size by 2%.
To not use object level compression, use, -nocomp. This flag will not add object level compression and will remove object level compression, if found; resulting in a document that is compatible with all versions of Acrobat.
To create a document that is ISO 32000 compliant, use -iso32000. This flag will do the following: Set file for ISO 32000 compliance, resulting in a document that is PDF version 1.7.
SecurSign 3.0
Use a custom seal for visible signatures in place of the default seal supplied with SecurSign. The custom seal can be any graphic file — a company logo or a “handwritten” signature, for example — as long as it is in PDF format.
Adjust the font size and position of the signature text to achieve the best fit with whatever seal you use.
Apply a visible signature to any PDF file, whether or not it contains a form field. You can create a signature field in a document and simultaneously apply a visible signature to it, or leave the field blank and add a signature later.
Known Issues
Security
If an input file has a user password set, the user password is copied over into the new output file even if -userpass <Password> is not supplied on the command line.
New signature fields may not be placed correctly on rotated pages
New signature fields should be placed horizontally on the bottom-left of the page, but on some rotated pages they are placed vertically on the bottom-right of the page. The following substitutions might correct this problem:
- For the -top option, use the page width minus the value you would normally use for the -left option.
- For the -bottom option, use the page width minus the value you would normally use for the -right option.
- For the -left option, use the value you would normally use for the -bottom option.
- For the -right option, use the value you would normally use for the -top option.
Default seal must be in working directory
A copy of default_seal.pdf must be in the working directory, even if you are not using it. This file is supplied with SecurSign. During installation, it is placed in the directory that contains the SecurSign application.
Cropped seal files may not display properly
If your custom seal is a cropped file, it may not display properly in the signature field. If so then, remove the cropping from the seal file before using it as part of a visible signature.
Placement of new signature field based on uncropped page size
SecurSign ignores any cropping of the input PDF file when adding a signature field to the file. The field is placed with respect to the lower-left of the uncropped page, not the cropped page. The user guide contains an example that shows how this might affect the values you choose as coordinates when you define a signature field. (See the first example under Placing a Visible Signature in a New Field.)
Name omitted from visible signature if not specified
The signer’s name is included in a visible signature only if it is specified using the -name option. This option does not default to the name on the digital certificate. However, the name on the certificate is used as the default for invisible signatures applied by SecurSign. Invisible signatures can be viewed in the Signatures pane of Adobe Acrobat or Adobe Reader.
Signature text does not wrap
The signature text does not wrap to fit the field; it is cropped instead. To make all of the text fit in the field, try adjusting the -font and -offset options. If you are creating a new field, you can also try increasing the width of the field to accommodate the text.
Signatures do not work with Adobe Forms Designer
SecurSign cannot sign form fields created with Adobe Forms Designer because they are not actually PDF files which use the AcroForms technology. Use form fields created with Acrobat, or create your own signature fields using SecurSign.
If Signature text does not display properly
If the signature text fails to display fails to display properly; check to make sure that your page is not rotated. A rotated page can make the signature field appear to be rotated. Also try adjusting the size of the signature field.
To Get Help
Contact technical support by:
emailing support@appligent.com, or calling 610-284-4006
Please provide the following:
Product name and version number
Operating system
Your name, company name, email address, and phone number
Description of your question or problem
Responses are typically emailed within one business day.