Quick Reference
Usage:  apgetinfo [options] inPDFFile1 [inPDFFile2 ...]

-summary     : Display summary information (default)
-info        : Display document Information Dictionary
-font        : Display font information

-pagesize    : Display size of all pages

-name        : Include file's name in output
-cmds        : Path to the file of commands -cmds only compatible with General Options

-bookmark    : Display bookmark information
-page        : Output to include page numbers
-path        : Output to include full bookmark path
-nolevel     : Output to not include indent level
-dest        : Output to include named destinations if they exist
-count       : Output to include total number of bookmarks in the document

-annot       : Display annotation information
-color       : Output to include annotation color information
-popup       : Output to include popup annotation information
-rect        : Output to include annotation rectangle
-link        : Output to include link annotations

-formfield   : Display formfield information

-metadata    : Display metadata

-n           : Do not write information to screen
-d <string>  : User password to open this document
-o <string>  : Output file instead of stdout
-l <string>  : Write progress to the given log file name
-p           : Write progress information to diagnostics
-v           : Print version information
-r <string>  : Application serial number
-h           : Show help
-help        : Show help
Introduction
Overview
APGetInfo is a command-line utility that enables you to retrieve a broad range of information about your PDF documents.
- Document information. This is similar to the descriptive information you would find with Adobe® Acrobat®’s Document Properties feature. It includes file name, author, subject, creation date, and so on, with some added statistics about fonts.
- Page Size information. The following statistics about each page in the document are included: full page size, printable page area, and degree of page rotation, if any.
- Bookmark information. A bookmark is a link to a specific page or view in a PDF document. You can obtain a list of bookmarks that optionally includes bookmark pages, named destinations, and the total number of bookmarks.
- Annotation information. This includes information about annotations, such as notes and highlights; popups associated with annotations; and links. The color and coordinates of each annotation can be included with the output.
- Form Field information. Form fields include text boxes, multi-line text boxes, check boxes, combo boxes, list boxes, buttons, radio buttons, and signatures. For each form field, APGetInfo returns the field name, field type, field value, and alternative name (tool tip text).
- Metadata information. XML metadata is specified in XMP, Adobe’s eXtensible Metadata Platform. XMP is based on RDF (Resource Description Framework), a standard model for supplying metadata. There are two schemas associated with XMP: PDF and XAP. APGetInfo extracts metadata for both schemas.
- Encryption information. Reports if a PDF file is encrypted and if so, which bit strength is set as well as which options are allowed and not allowed.
Example Commands
This guide contains numerous example commands to illustrate how to use APGetInfo.
Command-line presentation
Although you can call APGetInfo from a script or a program, most of the example commands are run from the command line. This presentation enables you to focus on APGetInfo without the distraction of other programming instructions. If you are new to entering commands in a terminal window or just need a refresher, read Command-Line Introduction, before trying the examples yourself.
The command-line examples are presented as if they were being run from the directory where you installed APGetInfo. In Windows, the default installation directory is C:\Appligent\APGetInfo. In Unix and Macintosh systems, it is wherever you installed it. For purposes of illustration, we assume you installed it in Appligent/APGetInfo.
Some long commands are shown on more than one line in this manual. However, you should enter all commands on a single line in the terminal window.
Sample files
These sample PDF files are included with APGetInfo and are used in the example commands:
- ApUtilsSample.pdf
- ApUtilsSampleEnc.pdf
They are located in the samples subdirectory where you installed the product.
You are encouraged to use these files to try the example commands yourself. But first make backups, in case you accidentally overwrite the files.
User Guide Conventions
The following typographic conventions are used in this guide:
- Courier Font is used for commands, command options, and output to mimic the appearance of the screen:
the -annot option
- The dollar sign character ($) is used to represent the command prompt:
$apgetinfo -annot samplefile.pdf
- Square brackets in a command indicate that the enclosed information may optionally be included but is not required. In the following example, [ inPDFFile2… ] indicates that additional input files may be included with the command, but are not required:
$apgetinfo -annot inPDFFile1 [ inPDFFile2... ]
How To Use This Guide
The best way to use this guide depends on your familiarity with command-line software in general and Appligent command-line products in particular.
- If you have little or no experience with command-line software, start with Command Line Introduction. That will give you a basic understanding of how APGetInfo works. Then read the remaining “how-to” chapters or skip to Command Line Option Reference for a summary of all the command-line options.
- If you are an experienced command-line user, but are not familiar with Appligent command-line products, start with Getting Document Information, Managing Input and Output, and Getting Page Size Information. They will give you a basic understanding of how APGetInfo works. Then read the remaining “how-to” chapters or skip to Command Line Option Reference for a summary of all the command-line options.
- If you are an experienced command-line user and are familiar with Appligent command-line products, start with Command Line Option Reference. This appendix illustrates the general command-line syntax and summarizes the command-line options. You can always refer to one of the “how-to” chapters for more information about a particular option.
For More Information
Please refer to the installation guide and the Readme File (release notes) for more information. Both are located on the installation CD and in the default directory.
Installation
Introduction
APGetInfo is a command-line application that retrieves information from PDF documents without Adobe® Acrobat®.
Memory Requirements
Minimum free memory available to run the application: 512 MBytes.
Windows Installation
Windows installation is handled by the installer and does not require any special handling.
Unix Installation
Setting environmental variables (All Unix Platforms)
In this release, there are two additional environmental variables that need to be set for APGetInfo on all UNIX platforms. If you run APGetInfo from the apgetinfo script created during installation, these environmental variables will be set by the script. If you run apgetinfoapp directly, you will need to set these environmental variables to run APGetInfo. Once APGetInfo is installed, you can view the variables needed by looking at the apgetinfo script created by the installer.
Setting the Appligent home directory (All Unix Platforms)
The environmental variable that stores the location of the Appligent home directory is APPLIGENT_HOME. The default location for the Appligent home directory is /usr/local/appligent. The Appligent home directory contains the library files and resources needed to run APGetInfo. It also contains license information for APGetInfo.
Example:
export APPLIGENT_HOME=/usr/local/appligent
Setting the APDFL library path (All Unix except AIX)
The APDFL library path must be added to the LD_LIBRARY_PATH variable. The APDFL library path is located in a subdirectory of the APPLIGENT_HOME directory.
The path should be set to ${APPLIGENT_HOME}/APDFLX.X.X/Libs
Example:
export LD_LIBRARY_PATH=${LD_LIBRARY_PATH}:${APPLIGENT_HOME}/APDFLX.X.X/Libs
Setting the APDFL library path (AIX Only)
The APDFL library path for AIX must be added to the LIBPATH variable. The APDFL library path is located in a subdirectory of the APPLIGENT_HOME directory.
The path should be set to ${APPLIGENT_HOME}/APDFLX.X.X/Libs.
Example:
export LIBPATH=${LIBPATH}:${APPLIGENT_HOME}/APDFLX.X.X/Libs
Registration numbers for APGetInfo
In previous versions of APGetInfo, the APGetInfo registration number was required as a command line option with the -r flag each time apgetinfoapp was run. An apgetinfo script was provided that automatically added -r and the registration number to the apgetinfoapp command line when the script was run.
In the current release, in addition to getting the registration number from the command line, APGetInfo can get the registration number from a license file in the Appligent home directory. License files are created by the installation script and stored in the ${APPLIGENT_HOME}/license directory. With a valid license file, the -r is no longer required on the command line. The -r option can still be used as in previous versions, and will override the value in the license file.
Getting Started with APGetInfo
Introduction
This chapter tells you what you need to know to get started with APGetInfo. You will learn:
- The basic structure of APGetInfo commands
- How to get product information about your installation of APGetInfo
APGetInfo Command Basics
All APGetInfo commands that you run from the command line start with the apgetinfo command name. The command name is followed by one or more options, which begin with a dash. Commands that you use to obtain information about a PDF document must also include an input file specification. For example, the following command instructs APGetInfo to display font information about myfile.pdf:
$apgetinfo -font pathname\myfile.pdf
Note: $ represents the command prompt. Two command options that do not require any PDF input, and therefore do not include an input file specification, are -v and -h. For example:
$apgetinfo -v
and
$apgetinfo -h
These options display information about the APGetInfo product—version number and usage (help) information—and are described in detail in this chapter. The remaining options, which are used to retrieve information from PDF files and perform related tasks, are discussed in subsequent chapters.
It is a good idea to test your installation of APGetInfo by displaying the product version number. You will also need this number if you ever contact Appligent’s Customer Support with a question.
Command
$apgetinfo -v
Result
The following listing is typical of the output you would receive. In addition to the product version number, it contains the release date and registration number. It also indicates that the registration number is valid.
Typical listing produced by -v option
# APGetInfo Version X.X Build Date XXXX, Library Version X.X.X
# Registration Number XXXX-XXXX-XXXX-XXXX-XXXX-XXXX
# License is valid.
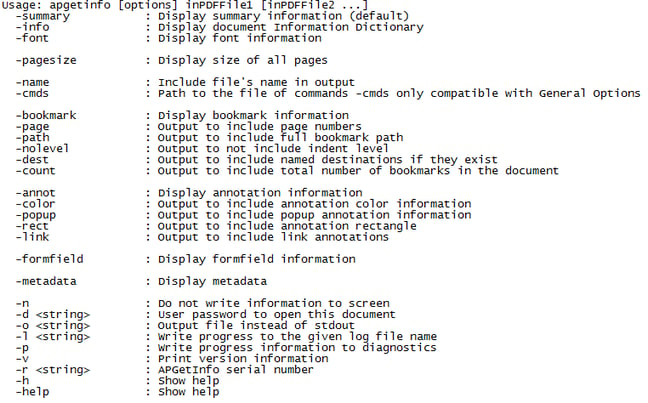
Displaying Product Usage Information
If you have a question about the command syntax or a command option, you can get help by displaying product usage information.
Command
$apgetinfo -h
Typical listing produced by -h option or -help option
Getting Document Information
Introduction
This chapter explains how to retrieve basic information about a PDF document. The information is similar to that found with Adobe Acrobat’s Document Properties feature with some added statistics.
You will learn how to:
- Obtain an overall snapshot of the document (-summary option) — Reports Document Information Properties (Title, Author etc.), total number for bookmarks, annotation information and font properties
- Retrieve document description information (-info option) — Reports Document Information Properties such as PDF version, number of pages, whether the file is encrypted or not and several other options
- Get font information (-font option) — Lists the names of fonts, type and whether the fonts are embedded or not in the file
- Get multiple types of information in the same report (-font, -info options) — An example of running multiple options. This example lists all the font properties as well as the PDF version, number of pages etc. in the document
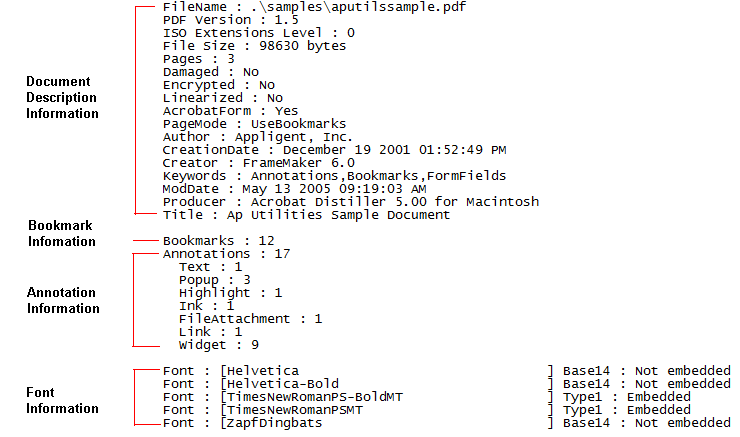
Obtaining an Overall Snapshot of the Document
To obtain a summary of information about a PDF document, submit the apgetinfo command with the document’s file name and the -summary option. You will receive a listing that includes information about the following:
- Document description
- Bookmarks
- Annotations
- Fonts
Command
$apgetinfo -summary pathname\ApUtilsSample.pdf
Tip! The -summary option is the default, so you don’t have to include it.
Windows Example
$apgetinfo C:\Appligent\APGetInfo\samples\ApUtilsSample.pdf
UNIX Example
$./apgetinfo /Appligent/APGetInfo/samples/ApUtilsSample.pdf
Result
The figure below shows the results of running apgetinfo with no options (or with the -summary option) on the ApUtilsSample.pdf file in a default Windows installation.
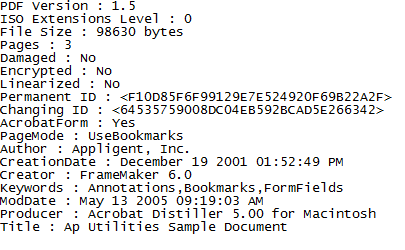
Retrieving Document Description Information
To see document description information for a PDF file, use the -info option when you submit the apgetinfo command. Document description information includes data that identifies a file, such as its title and creation date. In Adobe Acrobat and Adobe Reader, most of this information can be viewed on the Description panel of the Document Properties dialog box.
Command
$apgetinfo -info inPDFFile
Windows Example
$apgetinfo -info C:\Appligent\APGetInfo\samples\ApUtilsSample.pdf
UNIX Example
$./apgetinfo -info /Appligent/APGetInfo/samples/ApUtilsSample.pdf
Result
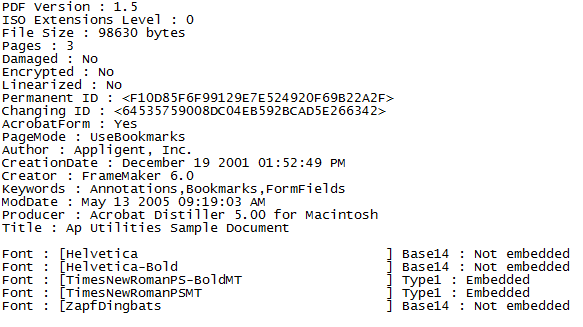
The figure below shows the results of running apgetinfo with the -info option on the ApUtilsSample.pdf file. The order of information (Title, Creator, Author, etc.) may vary from document to document, depending on how it was created.
Getting Font Information
To get information about the fonts in a PDF document, use the -font option with the apgetinfo command. The information displayed includes:
- The names of each font used in the document
- The font type (for example, Type 1, Base 14)
- Whether or not the font is embedded in the document
Command
$apgetinfo -font inPDFFile
Windows Example
$apgetinfo -font C:\Appligent\APGetInfo\samples\ApUtilsSample.pdf
UNIX Example
$./apgetinfo -font /Appligent/APGetInfo/samples/ApUtilsSample.pdf
Result
The figure below shows the results of running apgetinfo with the -font option on the ApUtilsSample.pdf file.
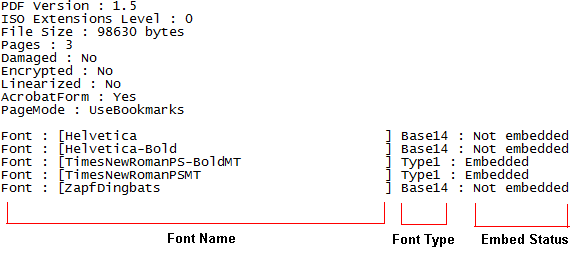
Getting Multiple Types of Document Information
You can list multiple types of document information by using a combination of options.
Command
$apgetinfo [document information options] inPDFFile
Windows Example
$apgetinfo -info -font C:\Appligent\APGetInfo\samples\ApUtilsSample.pdf
UNIX Example
$./apgetinfo -info -font /Appligent/APGetInfo/samples/ApUtilsSample.pdf
Result
The figure below shows the results of running apgetinfo with the -info and -font options on the ApUtilsSample.pdf file.
Managing Input and Output
Introduction
This chapter explains the basics of managing file input and output when retrieving information from one or more PDF documents.
You will learn how to:
- Retrieve information from an unsecured file — Basic command line for retrieving information from a PDF that does not have security set on the file
- Obtain information from an encrypted file (-d option) — Demonstrates basic command line for retrieving information from a PDF file that is encrypted
- Gather information from multiple files — Retrieve information from more than one file at a time
- Include the file name in the results (-name option) — This option reports the name of each PDF file. Helpful when running multiple files at one time
- Save the results to a text file (-o option) — Write the report information to a text file instead of just to STDOUT
For purposes of illustration, the examples in this chapter focus on managing input and output for the retrieval of document description information. (Document description information is discussed in Getting Document Information.) However, the input and output functions described here apply to all APGetInfo information gathering options, not just to obtaining document description information.
Retrieving Information from an Unsecured File
No special action is required to retrieve information from a PDF document that has no security applied to it. Just enter the apgetinfo command, followed by one or more options, and then the path name of the input file.
Command
$apgetinfo [options] inPDFFile
Windows Example
$apgetinfo -info C:\Appligent\APGetInfo\samples\ApUtilsSample.pdf
UNIX Example
$./apgetinfo -info /Appligent/APGetInfo/samples/ApUtilsSample.pdf
Result
The figure below shows the results of running apgetinfo with the -info option on the ApUtilsSample.pdf file supplied with APGetInfo. APGetInfo retrieves document description information from the document and sends it to the standard output device (STDOUT), the screen.
Note: The same command was used in Retrieving Document Description Information
Obtaining Information from an Encrypted File
To get information about an encrypted file, you must supply its User password. (The User password, which is also called an Open password, is required to open the document.)
Note: An Owner password (also called a Permissions or Master password) will not work correctly with APGetInfo. You must supply a User password.
Command
$apgetinfo -d userpassword [other options] inPDFFile
Windows Example
$apgetinfo -d userpass -info C:\Appligent\APGetInfo\samples\ApUtilsSampleEnc.pdf
UNIX Example
$./apgetinfo -d userpass -info /Appligent/APGetInfo/samples/ApUtilsSampleEnc.pdf
Result
This command uses the -d option to supply the User password (userpass) required to open ApUtilsSampleEnc.pdf. It then retrieves document description information from the document and directs the output to the screen (STDOUT). The output is shown in the figure below. It is the same as the output for the unsecured ApUtilsSample.pdf file shown in the figure above, except for the encryption information, the Changing ID and file size. (The ApUtilsSampleEnc.pdf file was created by saving ApUtilsSample.pdf as ApUtilsSampleEnc.pdf, and then creating a User password and adding other security settings.)
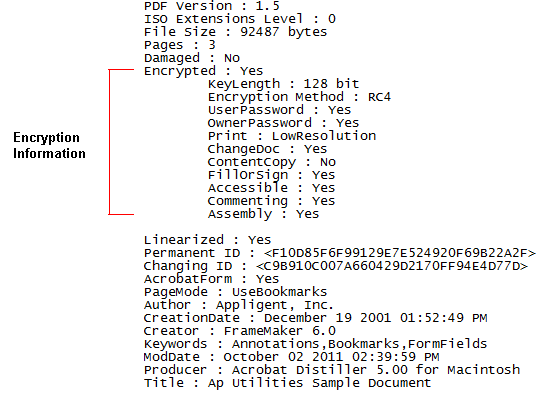
Note: If you fail to specify the -d option and a User password for an encrypted document, you will receive this error message:
Error: this document requires a password
Gathering Information from Multiple Files
You can retrieve information from more than one file at a time by specifying the path name for each input file. If you want to retrieve information from all of the PDF files in a directory, you can use the *.pdf wildcard specification as a shortcut.
If any of the input files are encrypted, you must also specify a User password. However, only one User password can be included on a command, and no information will be retrieved from encrypted files that have a different password. A separate command must be submitted for each User password.
Command
$apgetinfo [options] inPDFFile1 [inPDFFile2...]
Windows Examples
- Using full path names:
C:\Appligent\APGetInfo\apgetinfo -info -d userpass C:\Appligent\APGetInfo\samples\ApUtilsSample.pdf C:\Appligent\APGetInfo\samples\ApUtilsSampleEnc.pdf
- Substituting a wildcard shortcut:
c:\Appligent\APGetInfo\apgetinfo -info -d userpass C:\Appligent\APGetInfo\samples\*.pdf
UNIX Examples
- Using full path names:
$./apgetinfo -info -d userpass /Appligent/APGetInfo/samples/ApUtilsSample.pdf /Appligent/APGetInfo/samples/ApUtilsSampleEnc.pdf
- Substituting a wildcard shortcut:
$./apgetinfo -info -d userpass /Appligent/APGetInfo/samples/*.pdf
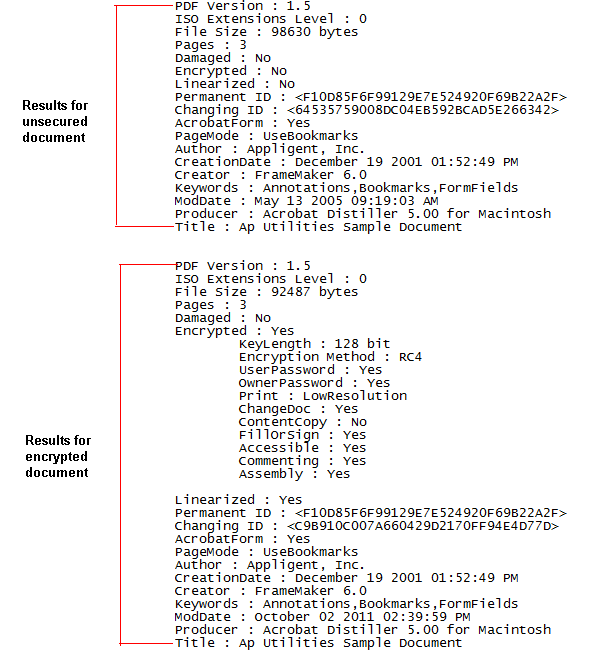
Result
The figure below shows the results of running apgetinfo with the -info option and the -d option on the ApUtilsSample.pdf and ApUtilsSampleEnc.pdf files supplied with APGetInfo. APGetInfo retrieves document description information from both of these documents and sends the results to the standard output device (STDOUT), the screen. The -d option is required to open the encrypted ApUtilsSampleEnc.pdf file. This option is ignored by the ApUtilsSample.pdf file, which is unsecured and does not need a password.
Including the File Name in the Results
When you run multiple commands or include multiple input files on one command, it can be helpful to include the name of each input file with its results. You can do this with the -name option.
Command
$apgetinfo -name [other options] inPDFFile
Windows Example
$apgetinfo -name -info -d userpass C:\Appligent\APGetInfo\samples\*.pdf
UNIX Example
$./apgetinfo -name -info -d userpass /Appligent/APGetInfo/samples/*.pdf
Result
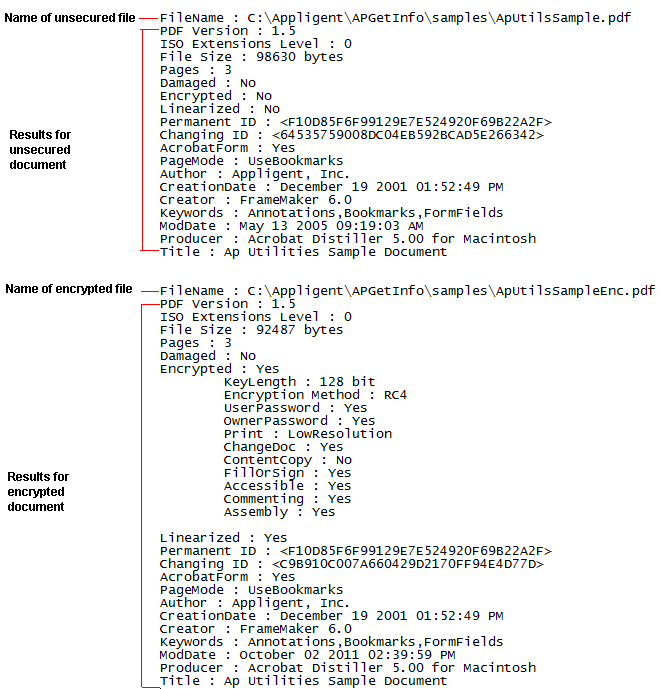
The figure below shows the results of running apgetinfo with the -name option, -info option, and -d option on the two sample files supplied with APGetInfo: ApUtilsSample.pdf and ApUtilsSampleEnc.pdf. (The -d option is required because ApUtilsSampleEnc.pdf is an encrypted file that can only be opened with a User password.) The output is essentially the same as that shown in the figure above, except for the addition of a file name at the beginning of each set of results. The file names, included because of the addition of the -name option, clearly indicate which file each set of results belongs to.
Note: These results were obtained on a Windows platform, as indicated by the C: root directory and backward slashes in the file names.
Writing the Results to a Text File
By default, APGetInfo directs all output to the screen (STDOUT). To write your output to a file instead, specify the -o option, followed by the name of a text file. If you want your output file to go to a particular directory, be sure it exists beforehand. APGetInfo will not create a new directory.
Command
$apgetinfo -o outFile.txt [other options] inPDFFile
Windows Example
$apgetinfo -o C:\Appligent\APGetInfo\samples\myoutput.txt -name -info -d userpass C:\Appligent\APGetInfo\samples\*.pdf
UNIX Example
$./apgetinfo -o /Appligent/APGetInfo/samples/myoutput.txt -name -info -d userpass /Appligent/APGetInfo/samples/*.pdf
Result
The results are exactly the same as those shown in the figure above, except they are saved in myoutput.txt instead of being displayed on the screen.
Getting Page Size Information
Introduction
This chapter explains how to get information about the size and rotation of each page in a PDF document using the -pagesize option.
The figure below shows the first page of the ApUtilsSample.pdf file supplied with APGetInfo, along with its dimensions.
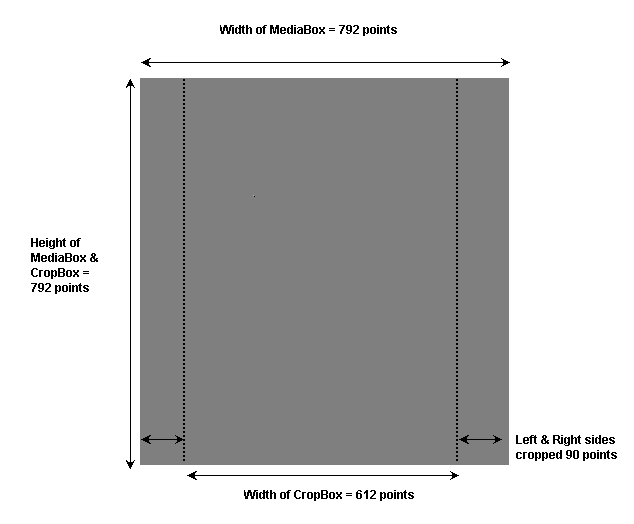
The MediaBox is the full page size. APGetInfo supplies the coordinates of the MediaBox in points, measured from the bottom left of the page. The MediaBox in the figure above is 792 x 792 points. Its coordinates are: left=0, bottom=0, right=792, top=792.
The CropBox is the printable page area. It excludes any margins that have been cropped from the page. APGetInfo supplies the coordinates of the CropBox in points, measured from the bottom left of the page. The CropBox in the figure above is 612 x 792 points. Its coordinates are: left=90, bottom=0, right=702, top=792.
APGetInfo also retrieves page rotation information. For example, a PageRotate value of 0 indicates the page has not been rotated, while a value of 180 indicates a page rotated 180 degrees, or turned upside down. The PageRotate value of the figure above is 0.
Retrieving Page Size Information
To retrieve page size information for a PDF document, use the -pagesize option with the apgetinfo command.
Command
$apgetinfo -pagesize [other options] inPDFFile
Windows Example
$apgetinfo -pagesize C:\Appligent\APGetInfo\samples\ApUtilsSample.pdf
UNIX Example
$./apgetinfo -pagesize /Appligent/APGetInfo/samples/ApUtilsSample.pdf
Result
The figure below shows the results of running apgetinfo with the -pagesize option on the ApUtilsSample.pdf file supplied with APGetInfo. APGetInfo retrieves page size information from the document and sends it to the standard output device (STDOUT), the screen. Note how the MediaBox and CropBox values for page 1 compare with the dimensions of that page shown in the figure above.
*************Pagesize Information**************

===============================
Page : 1
MediaBox : left = 0.000, bottom = 0.000, right = 792.000, top = 792.000
CropBox : left = 90.000, bottom = 0.000, right = 702.000, top = 792.000
PageRotate : 0
===============================
Page : 2
MediaBox : left = 0.000, bottom = 0.000, right = 792.000, top = 792.000
CropBox : left = 90.000, bottom = 0.000, right = 702.000, top = 792.000
PageRotate : 0
===============================
Page : 3
MediaBox : left = 0.000, bottom = 0.000, right = 792.000, top = 792.000
CropBox : left = 90.000, bottom = 0.000, right = 702.000, top = 792.000
PageRotate : 0

***********************************************
Getting Bookmark Information
In this chapter…
you will learn how to:
- Retrieve a simple list of bookmarks (-bookmark option) — Basic listing of bookmarks in file
- Display the total number of bookmarks (-count option) — Reports the total number of bookmarks
- Create a bookmark list with no level indicators (-nolevel option) — Display a long list of bookmarks
- Show the full path for each bookmark (-path option) — Shows the full path of each bookmark in the file
- Display the page number of each bookmark (-page option) — Reports the page number for each bookmark
- Include named destinations for bookmarks, if they exist (-dest option) — Displays the named destination of bookmarks if they exist
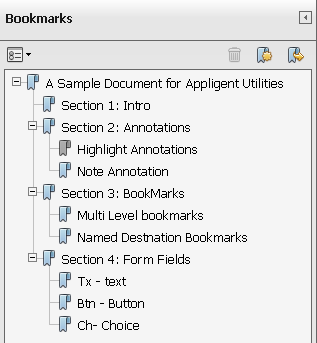
A bookmark is a link to a specific page or view in a document. In Adobe Acrobat and Adobe Reader, a document’s bookmarks are displayed on the Bookmarks tab of the Navigation pane. The figure below shows the Bookmarks tab for the ApUtilsSample.pdf file supplied with APGetInfo.
Retrieving a Simple List of Bookmarks
Use the -bookmark option to list all of the bookmarks in a PDF document, numbered and indented according to level.
Command
$apgetinfo -bookmark inPDFFile
Windows Example
$apgetinfo -bookmark C:\Appligent\APGetInfo\samples\ApUtilsSample.pdf
UNIX Example
$./apgetinfo -bookmark /Appligent/APGetInfo/samples/ApUtilsSample.pdf
Result
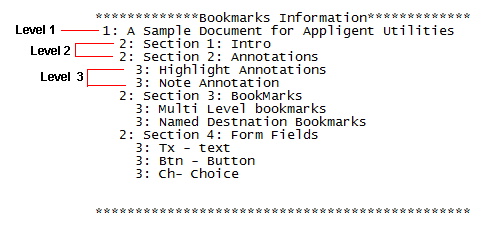
The figure below shows the results of running apgetinfo with the -bookmark option on the ApUtilsSample.pdf file. Note that both numbers and indention are used to indicate the bookmark level.
Displaying the Total Number of Bookmarks
To count the number of bookmarks and display the total at the end of the bookmark list, use the -count option with the -bookmarkoption.
Command
$apgetinfo -bookmark -count inPDFFile
Windows Example
$apgetinfo -bookmark -count C:\Appligent\APGetInfo\samples\ApUtilsSample.pdf
UNIX Example
$./apgetinfo -bookmark -count /Appligent/APGetInfo/samples/ApUtilsSample.pdf
Result
The figure below shows the results of running apgetinfo with the -count option and the -bookmark option on the ApUtilsSample.pdf file. The total number of bookmarks in the document appears at the bottom of the list.

Creating a Bookmark List with No Level Indicators
To list the bookmarks without any indication of level, use the -nolevel option with the -bookmark option.
Command
$apgetinfo -bookmark -nolevel inPDFFile
Windows Example
$apgetinfo -bookmark -nolevel C:\Appligent\APGetInfo\samples\ApUtilsSample.pdf
UNIXExample
$./apgetinfo -bookmark -nolevel /Appligent/APGetInfo/samples/ApUtilsSample.pdf
Result
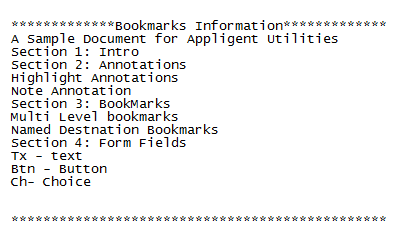
The figure below shows the results of running apgetinfo with the -nolevel option and the -bookmark option on the ApUtilsSample.pdf file. The bookmark entries do not include level numbers, and they are displayed flush left.
Showing the Full Path for Each Bookmark
To show the full document path for each bookmark, use the -path option with the -bookmark option.
Command
$apgetinfo -bookmark -path inPDFFile
Windows Example
$apgetinfo -bookmark -path C:\Appligent\APGetInfo\samples\ApUtilsSample.pdf
UNIX Example
$./apgetinfo -bookmark -path /Appligent/APGetInfo/samples/ApUtilsSample.pdf
Result
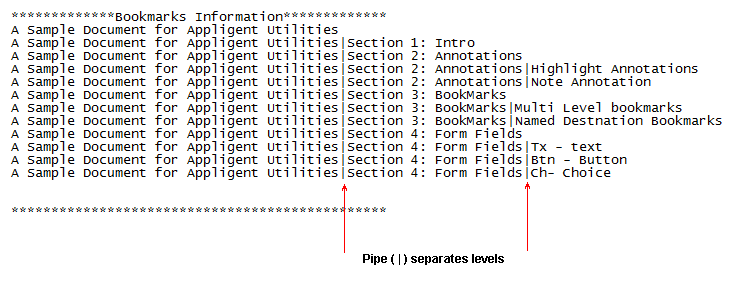
The figure below shows the results of running apgetinfo with the -path option and the -bookmark option on the ApUtilsSample.pdf file. For each bookmark entry, the full document path is displayed, beginning with the document title. The entries are not numbered or indented to indicate levels. Levels within each entry are separated by a pipe, or vertical bar (|).
Displaying the Page Number of Each Bookmark
To show the document page number of each bookmark, use the -page option with the -bookmark option.
Command
$apgetinfo -bookmark -page inPDFFile
Windows Example
$apgetinfo -bookmark -page C:\Appligent\APGetInfo\samples\ApUtilsSample.pdf
UNIX Example
$./apgetinfo -bookmark -page /Appligent/APGetInfo/samples/ApUtilsSample.pdf
Result
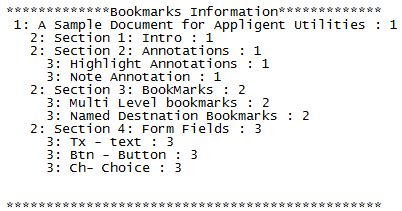
The figure below shows the results of running apgetinfo with the -page option and the -bookmark option on the ApUtilsSample.pdf file. A page number appears to the right of each bookmark entry.
Including Bookmark Destinations
Named destinations are links to specific locations in the current or other documents. They can be user defined or generated automatically by PDF creation software. If any of the bookmarks in a document have named destinations, you can include them in your output by using the -dest option with the -bookmark option and the -page option.
Command
$apgetinfo -bookmark -page -dest inPDFFile
Windows Example
$apgetinfo -bookmark -page -dest C:\Appligent\APGetInfo\InPDFFile.pdf
UNIX Example
$./apgetinfo -bookmark -page -dest /Appligent/APGetInfo/InPDFFile.pdf
Result
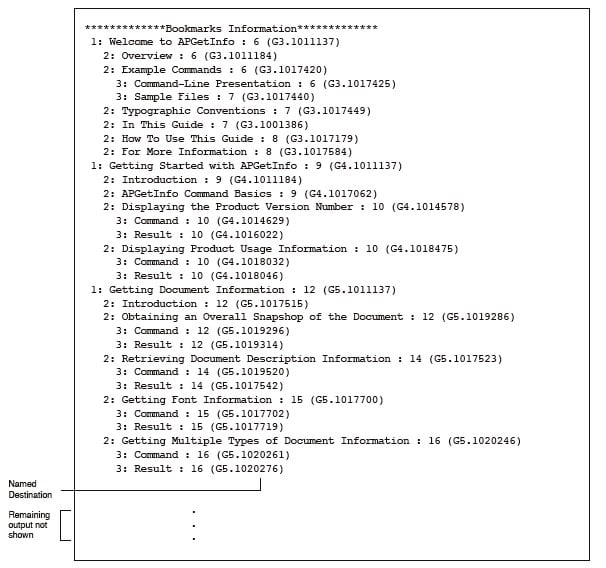
The figure below shows the results of running apgetinfo with the -dest, -page, and -bookmark options on a PDF which has bookmarks with named destinations. Only the bookmarks for the first three chapters are shown.
Getting Multiple Types of Bookmark Information
You can use two or more options in combination to obtain multiple types of bookmark information.
Command
$apgetinfo [bookmark options] inPDFFile
Windows Example
$apgetinfo -bookmark -nolevel -page -count C:\Appligent\APGetInfo\samples\ApUtilsSample.pdf
UNIX Example
$./apgetinfo -bookmark -nolevel -page -count /Appligent/APGetInfo/samples/ApUtilsSample.pdf
Result
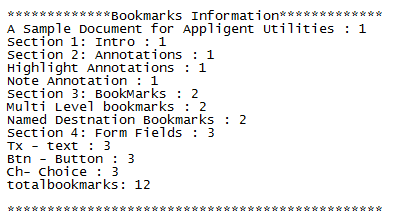
The figure below shows the results of running apgetinfo with the -bookmark, -nolevel, -page, and -count options on the ApUtilsSample.pdf file.
Getting Annotation Information
In this chapter….
you will learn how to…
- Retrieve a simple list of annotations (-annot option) — Reports a list of all annotations in the PDF
- Display the color of each annotation (-color option) — Retrieve the RGB color value for each annotation
- Add popup details to the annotation list (-popup option) — Include popup information of annotations
- Display the size and location of each annotation (-rect option) — Reports the location of each annotation
- Add link details to the annotation list (-link option) — Description of each link in the document
- Get more that one type of annotation information at one time (multiple options) — Examples of running multiple options at one time
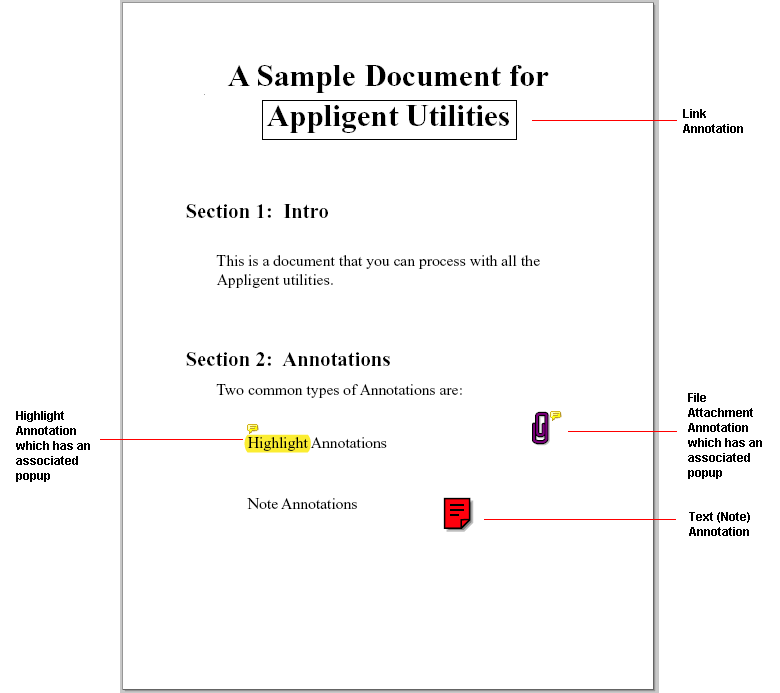
Annotations include notes, text, audio, stamps, form fields (widgets), files, pencil marks, rectangles, ellipses, lines, highlights, cross outs (strikethroughs), and underlines. The figure below shows the annotation information on the first page of the sample ApUtilsSample.pdf file supplied with APGetInfo.
Retrieving a Simple List of Annotations
Use the -annot option to retrieve a simple list of annotations from the document. The annotation list includes the following information:
- A detailed description of each annotation in the document, including the annotation type, title, creation date, and contents
- A summary showing the total number of annotations and the number of annotations by type
Command
$apgetinfo -annot inPDFFile
Windows Example
$apgetinfo -annot C:\Appligent\APGetInfo\samples\ApUtilsSample.pdf
UNIX Example
$./apgetinfo -annot /Appligent/APGetInfo/samples/ApUtilsSample.pdf
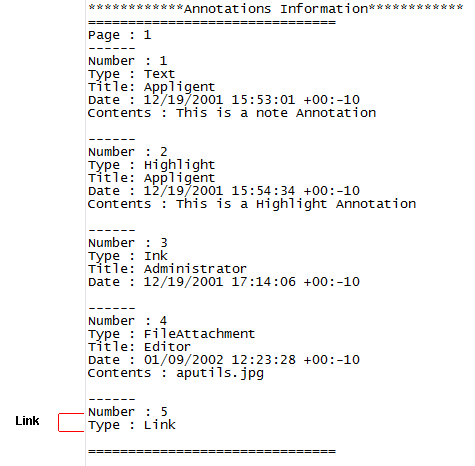
Result
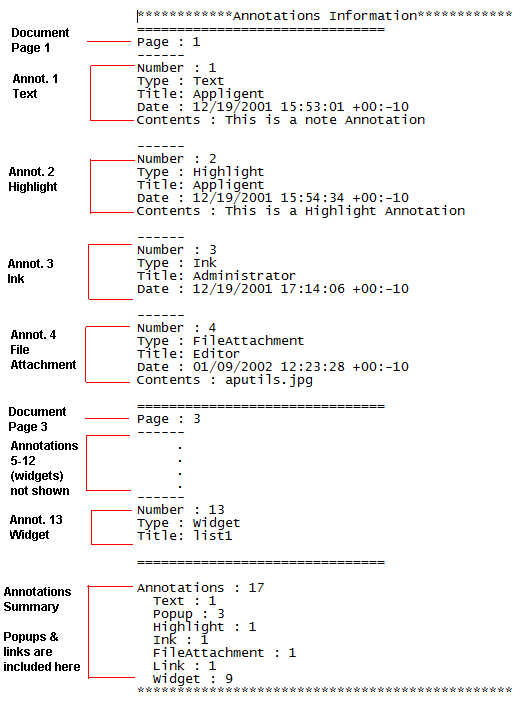
The figure below shows the results of running apgetinfo with the -annot option on the ApUtilsSample.pdf file. The first section of the listing describes each annotation in detail: one text, one highlight, one ink, one attachment, and eight widgets (form fields). Following the detailed descriptions is a summary of all the annotations in the document. The summary indicates that the document contains 17 annotations, but only 13 of these are included in the detailed descriptions.
Note: The annotation popups and link are not included in the detailed descriptions. For more information, see Adding Popup Details to the Annotation List and Adding Link Details to the Annotation List.
Displaying the Color of Each Annotation
Use the -color option with the -annot option to retrieve the RGB color value of each annotation in the document.
The color of each annotation is displayed as an RGB value. Each RGB value is composed of a red, green, and blue component:
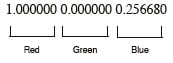
The value of each component indicates how much of that component is included in the annotation color:
- 1.000000 indicates that 100% of that component is included in the annotation color.
- 0.000000 indicates that none of that component is included in the annotation color.
- A value in between indicates that some of that component is included in the annotation color. The following are some examples of RGB values and the colors they represent:
| RGB Value | Color | Composed of |
|---|---|---|
| 0.000000 0.000000 0.000000 | Black | No red, no green, and no blue |
| 1.000000 1.000000 1.000000 | White | 100% red, 100% green, and 100% blue |
| 1.000000 0.000000 0.000000 | Red | 100% red, no green, and no blue |
| 0.000000 1.000000 0.000000 | Green | No red, 100% green, and no blue |
| 0.312850 0.611980 0.067990 | Light Green | 31.285% red, 61.198% green, and 6.799% blue |
Command
$apgetinfo -annot -color inPDFFile
Windows Example
$apgetinfo -annot -color C:\Appligent\APGetInfo\samples\ApUtilsSample.pdf
UNIX Example
$./apgetinfo -annot -color /Appligent/APGetInfo/samples/ApUtilsSample.pdf
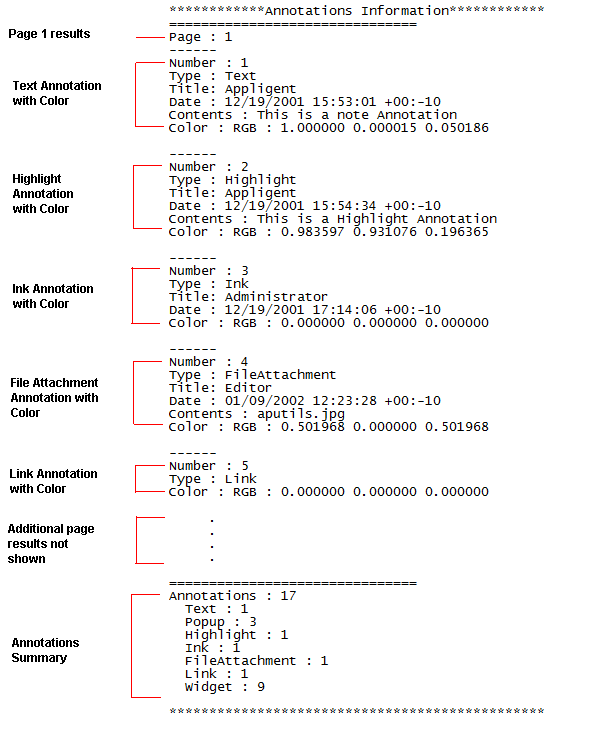
Result
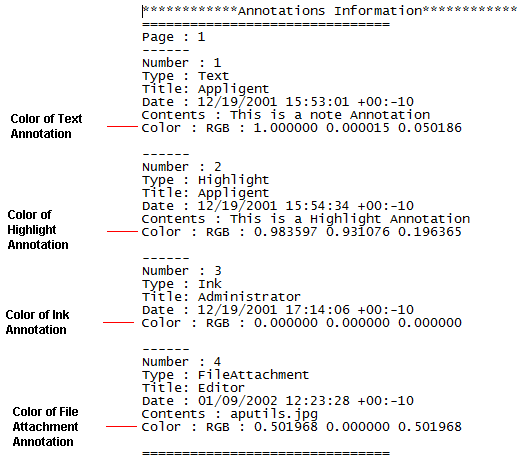
The figure below shows the results of running apgetinfo on the ApUtilsSample.pdf file when using the -color option with the -annot option. Only the first page results are shown.
Adding Popup Details to the Annotation List
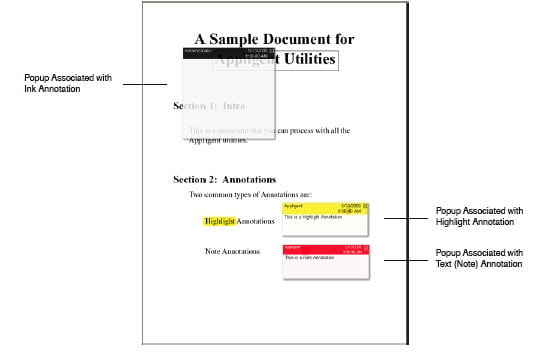
The figure below shows the popups associated with the annotations on the first page of the ApUtilsSample.pdf file. When you use the -annot option by itself, APGetInfo lists the total number of annotation popups, but does not include any detailed information about them. To obtain a description of each annotation popup in the document, use the -popup option with the -annot option.
Command
$apgetinfo -annot -popup inPDFFile
Windows Example
$apgetinfo -annot -popup C:\Appligent\APGetInfo\samples\ApUtilsSample.pdf
UNIX Example
$./apgetinfo -annot -popup /Appligent/APGetInfo/samples/ApUtilsSample.pdf
Result
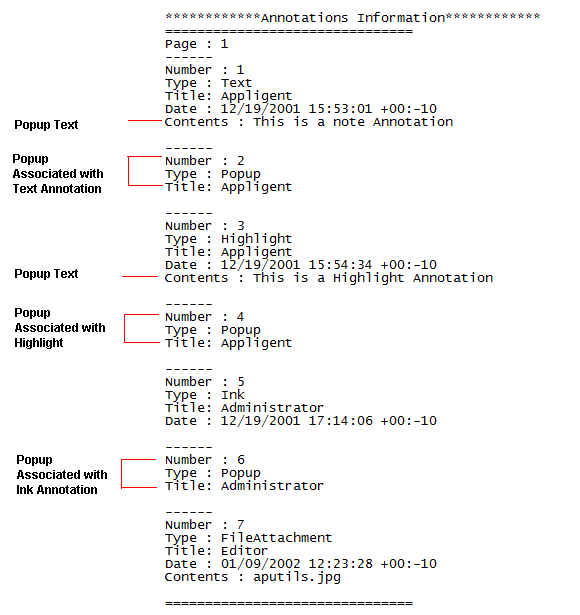
The figure below shows the results of running apgetinfo on the ApUtilsSample.pdf file when using the -popup option with the -annot option. Only the first page results are shown. (Only the first page of the document contains popups.) Note that the popup is listed directly after the annotation it is associated with, but any popup text (content) is listed with the annotation, not the popup.
Displaying the Size and Location of Each Annotation
Use the -rect option with the -annot option to display the size and location of each annotation in the document.
Command
$apgetinfo -annot -rect inPDFFile
Windows Example
$apgetinfo -annot -rect C:\Appligent\APGetInfo\samples\ApUtilsSample.pdf
UNIX Example
$./apgetinfo -annot -rect/Appligent/APGetInfo/samples/ApUtilsSample.pdf
Result
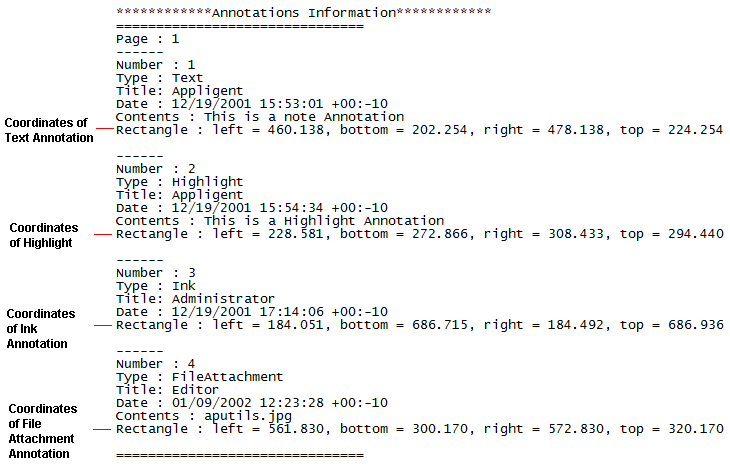
The figure below shows the results of running apgetinfo on the ApUtilsSample.pdf file when using the -rect option with the -annot option. Only the first page results are shown.
For each annotation, four coordinates define the size of the annotation rectangle and its position on the cropped page, in points. (The cropped page, also called the CropBox, is the printable page area. It is the full page size minus any cropping, or margins.) The left and right coordinates are measured from the left of the cropped page. The bottom and top coordinates are measured from the bottom of the cropped page. For example, the rectangle for the Text annotation in the figure below is 18 points wide (from 460.138 to 478.138 points from the left of the cropped page) and 22 points high (from 202.254 to 224.254 points from the bottom of the cropped page).
Adding Link Details to the Annotation List
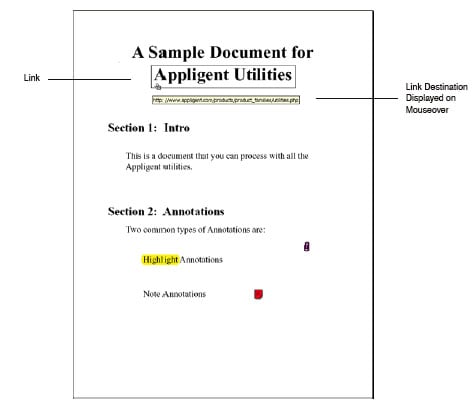
Links are commonly found within documents for jumping to another page or section of the document, opening a file, or opening a web page. You can also use links to initiate actions, such as playing a sound or movie file, or to submit forms. The figure below shows the only link in the ApUtilsSample.pdf file.
When you use the -annot option by itself, APGetInfo displays the total number of link annotations, but does not include any detailed information about those links. To obtain a description of each link in the document, use the -link option with the -annot option.
Command
$apgetinfo -annot -link inPDFFile
Windows Example
$apgetinfo -annot -link C:\Appligent\APGetInfo\samples\ApUtilsSample.pdf
UNIX Example
$./apgetinfo -annot -link /Appligent/APGetInfo/samples/ApUtilsSample.pdf
Result
The figure below shows the results of running apgetinfo on the ApUtilsSample.pdf file when using the -link option with the -annot option. Only the first page results are shown. (The only link in the document is on the first page.)
Getting Multiple Types of Annotation Information
You can use two or more options in combination to list multiple types of annotation information.
Command
$apgetinfo [annotation options] inPDFFile
Windows Example
$apgetinfo -annot -link -color C:\Appligent\APGetInfo\samples\ApUtilsSample.pdf
UNIX Example
$./apgetinfo -annot -link -color /Appligent/APGetInfo/samples/ApUtilsSample.pdf
Result
The figure below shows the results of running apgetinfo with the -annot, -link, and -color options on the ApUtilsSample.pdf file. Only the first page results are shown. The -link option causes the link information to be displayed. The -color option causes the RGB value of the annotations and the link to be displayed.
Getting Form Field Information
Introduction
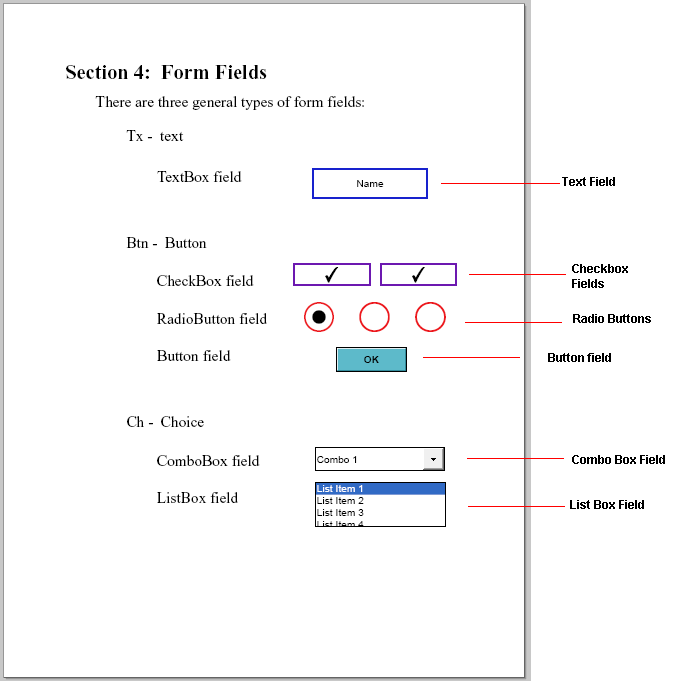
Form fields include text boxes, multi-line text boxes, check boxes, combo boxes, list boxes, buttons, radio buttons, and signatures. In this chapter, you will learn how to retrieve a list of form fields using the -formfield option.
The figure below shows the form fields on the third page of the ApUtilsSample.pdf file supplied with APGetInfo.
Retrieving a Simple List of Form Fields
Use the -formfield option to list all of the form fields in a PDF document.
Command
$apgetinfo -formfield inPDFFile
Windows Example
$apgetinfo -formfield C:\Appligent\APGetInfo\samples\ApUtilsSample.pdf
UNIX Example
$./apgetinfo -formfield /Appligent/APGetInfo/samples/ApUtilsSample.pdf
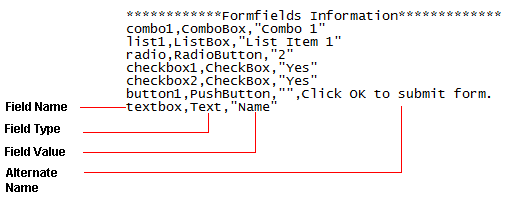
Result
The figure below shows the results of running apgetinfo with the -formfield option on the ApUtilsSample.pdf file. For each form field, the following information is returned: field name, field type, field value, and alternative name (tool tip text), if one exists. Note that the button field does not have a value. It is also the only field that has an alternative name.
The following table describes the value returned for each field type.
| Field Type | Common Name | Value |
|---|---|---|
| Push Button | Button | None. |
| Radio Button | Radio Button | The export value of the button. In a group of radio buttons, the export value of the selected button. |
| Check Box | Check Box | The export value, if the box is checked. |
| Text | Text Box | The text in the box. |
| MultiLine Text | Multi-line Text Box | The text in the box. |
| ListBox | List Box | The export value of the selected item. |
| ComboBox | Combo Box | The export value of the selected item. |
| Signature | Signature | None. |
Exporting XML Metadata
Introduction
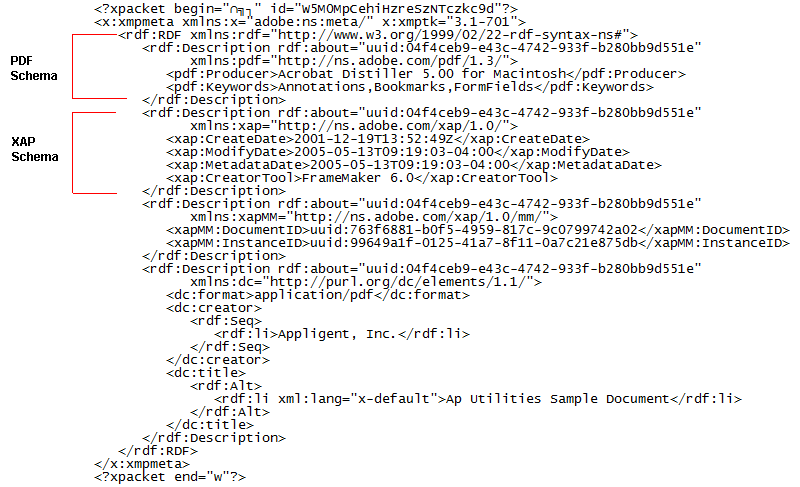
This chapter explains how to export XML metadata from PDF documents that have been saved in or created by Adobe Acrobat 5.0 or above. The metadata is specified in XMP, Adobe’s eXtensible Metadata Platform. XMP is based on RDF (Resource Description Framework), a standard model for supplying metadata. There are two schemas associated with XMP: PDF and XAP. PDF files provide metadata in both formats.
Note: XML metadata is only available in PDF files created by Acrobat 5 and above. PDF files created prior to Acrobat 5 will return the following warning:
Warning: This file does not contain any XML metadata
Performing the Export
Use the -metadata option to export XML metadata from a PDF document.
Command
$apgetinfo -metadata inPDFFile
Windows Example
$apgetinfo -metadata C:\Appligent\APGetInfo\samples\ApUtilsSample.pdf
UNIX Example
$apgetinfo -metadata /Appligent/APGetInfo/samples/ApUtilsSample.pdf
Result
The figure below shows the results of running apgetinfo with the -metadata option on the ApUtilsSample.pdf file. Note the PDF schema and the XAP schema.
Reporting Progress and Errors
In this chapter….
you will learn how to…..
- Display progress messages (-p option) — Display progress to screen (STDOUT)
- Direct error messages to a user-specified text file (-l option) — Write progress and/or error messages to a file you specify
- Write all messages to a user-specified text file (-p and -l options together) — Direct all progress and errors to file
By default, APGetInfo writes any error messages to the screen (STDOUT) and to the default log file, apgetinfo.log. With APGetInfo’s reporting options, you can display progress messages, as well, and direct your messages to a file other than the default log file.
These reporting options are useful for debugging and for understanding how APGetInfo works. In addition, if you ever contact Appligent Customer Support with a problem, we will want to see all messages generated by the command you were running when the problem occurred.
Note: For purposes of illustration, the examples in this chapter focus on reporting messages generated by commands used to obtain document description information. (Document description information is discussed in Getting Document Information) However, the reporting functions described here apply to logging the results of all APGetInfo information retrieval commands, not just to those involving the retrieval of document description information.
Displaying Progress Messages
To reduce clutter, APGetInfo does not show you any messages unless they represent errors that require your attention. These messages are directed to the screen (STDOUT) and to the default log file, apgetinfo.log. If you also want to see standard progress messages, use the -p option to instruct APGetInfo to write them to the screen and to apgetinfo.log.
Command
$apgetinfo -p [other options] inPDFFile
Windows Example
$apgetinfo -p -info C:\Appligent\APGetInfo\samples\ApUtilsSample.pdf
UNIX Example
$./apgetinfo -p -info /Appligent/APGetInfo/samples/ApUtilsSample.pdf
Result
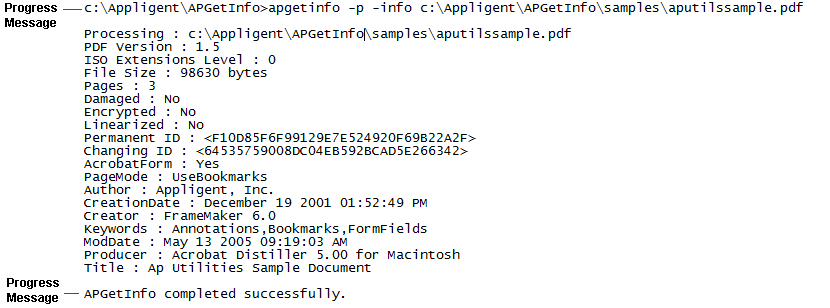
The -p option instructs APGetInfo to write progress messages to the screen and to the default log file, apgetinfo.log. If apgetinfo.log does not already exist, it is created in the directory where APGetInfo is installed. An entry like the one shown in the figure below is then created in apgetinfo.log.

The same progress messages are displayed on the screen, but without the date, as shown in the figure below.
Directing Error Messages to a User-Specified File
By default, APGetInfo writes any error messages to the screen (STDOUT) and to the default log file, apgetinfo.log. You can direct error messages to a different log file by specifying the -l option, followed by the name of the file. The file must be in text format (.txt).
Note: The log file must be write-enabled. If it is a read-only file, the following warning is displayed and nothing is written to the file:
Warning: error opening log file filename.txt
Command
$apgetinfo -l logFile.txt [other options] inPDFFile
Windows Example
$apgetinfo -l C:\Appligent\APGetInfo\mylogfile.txt -info C:\Appligent\APGetInfo\samples\ApUtilsSampleEnc.pdf
UNIX Example
$./apgetinfo -l /Appligent/APGetInfo/mylogfile.txt -info /Appligent/APGetInfo/samples/ApUtilsSampleEnc.pdf
Result
The example commands shown above generate an error, because the ApUtilsSampleEnc.pdf file requires a User password to open it, but the -d option and User password are not included. The -l option directs the associated error message to mylogfile.txt, instead of the default apgetinfo.log file. The error message created in mylogfile.txt looks like the one shown below. The same error message is displayed on the screen.

Writing All Messages to a User-Specified File
You can have APGetInfo write both error messages and progress messages to a log file of your choice by specifying the -p option and the -l option, followed by the name of the log file. The file must be in text format (.txt). All messages written to the file are also written to the screen (STDOUT).
Note: The log file must be write-enabled. If it is a read-only file, the following warning is displayed and nothing is written to the file:
Warning: error opening log file filename.txt
Command
$apgetinfo -p -l logFile.txt [other options] inPDFFile
Windows Example
$apgetinfo -p -l C:\Appligent\APGetInfo\mylogfile.txt -info -d userpass C:\Appligent\APGetInfo\samples\ApUtilsSampleEnc.pdf C:\Appligent\APGetInfo\samples\ApUtilsSample.pdf
UNIX Example
$./apgetinfo -p -l /Appligent/APGetInfo/mylogfile.txt -info -d userpass /Appligent/APGetInfo/samples/ApUtilsSampleEnc.pdf /Appligent/APGetInfo/samples/ApUtilsSample.pdf
Result
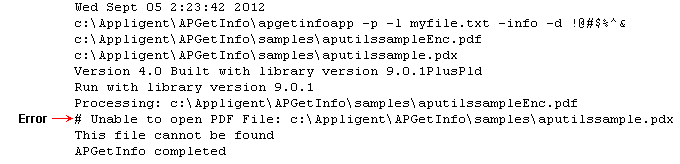
The example commands shown above generate an error, because the ApUtilsSample.pdx file does not exist. (The file name was typed incorrectly; the extension should be pdf, not pdx.). The second input file, ApUtilsSampleEnc.pdf file, is successfully processed. Progress and error messages like those shown in the figure below are written to mylogfile.txt. The same messages are displayed on the screen.
APGetInfo Command Line Introduction
Introduction
APGetInfo is a command-line application. If you are used to the Microsoft Windows operating system, you may not be familiar with running command-line tools. This section shows you all you need to get started.
- Windows tells you how to use APGetInfo on Windows.
Note: You can refer to the Getting Started With Command Line Applications for additional information on using command-line applications.
Windows
To run APGetInfo in Windows, you need to open a Command Prompt window.
In Windows:
- Click Start > Programs > Accessories > Command Prompt
The Command Prompt window opens.
Some basic commands
At the command prompt, you type each command, and press the Enter key to execute it. You can use the mouse to select text to copy or cut to the clipboard, but you cannot position the cursor with it. The command line is completely keyboard driven. Navigation keys are shown below:
| Key | Action |
|---|---|
| Backspace | Delete previous character |
| Right arrow | Move right one character |
| Left arrow | Move left one character |
| Up arrow | Recall previous command |
| Tab | File or directory name auto complete |
| Enter | Execute command |
In addition to running programs, you have many commands to navigate and maintain the system. Two important ones are cd and dir.
Changing directories
Use the cd command to change directories. For example, to change to the directory that APGetInfo is located in, type:
C:\>cd \Appligent\APGetInfo\
The command prompt changes to:
C:\Appligent\APGetInfo>
to show you where you are.
To move back one level, use the shortcut of two periods (..)
C:\Appligent\APGetInfo>cd..
Don’t forget to press the Enter key after every command. You will now be in this directory:
C:\Appligent>
Move back to APGetInfo:
C:\Appligent>cd APGetInfo
Listing the contents of a directory
Use the dir command to list the contents of a directory:
C:\Appligent\APGetInfo>dir
The computer responds with a listing of all the contents of the APGetInfo directory.
If the directory contents fly by too fast to read, do this:
C:\Appligent\APGetInfo>dir /p
The /p switch tells DOS to display one page at a time. Press the Enter key to see the next page.
To see the contents of all the subdirectories at the same time, type:
C:\Appligent\APGetInfo>dir /s
This displays the contents of APGetInfo and all the subdirectories under it.
Running APGetInfo
To run APGetInfo, type the commands on the command line as shown in other sections of this manual and press Enter. For example:
$apgetinfo -o \files\output.txt [options] samples\input.pdf
In this example, the dollar sign stands for the command prompt, a convention used throughout this manual. The command processes the input.pdf file using the options you provide, and then saves the results to output.txt. Note that the relative path is included in the file specifications, so that APGetInfo knows where to find the files. However, the safest way to specify files is to use the full path:
$apgetinfo -o c:\Appligent\APGetInfo\files\output.txt [options] c:\Appligent\APGetInfo\samples\input.pdf
If you do not specify the correct path, you will get a “file not found” error.
Note: Each command must be typed on one line, even if it is presented on more than one line in the manual to fit on the page.
Now, refer to the rest of this User Guide for details about using APGetInfo.
APGetInfo Command Line Option Reference
Introduction
This appendix describes the apgetinfo command syntax and summarizes the options you can use with the apgetinfo command.
Command Syntax
apgetinfo [options] inPDFFile1 [inPDFFile2 ...]
Product Information Options
The following table describes options you can use to obtain information about the APGetInfo product. For more information about these options, see Getting Started with APGetInfo.
| Option | Function | Description | Example |
|---|---|---|---|
| -v | Show version information | Displays the version of APGetInfo you are running. This is important when corresponding with support@Appligent.com. In order to best understand your problem, we must know what version of the software you have. | apgetinfo -v |
| -h or -help |
Show help | Displays all available command-line options, plus version information. | apgetinfo -h apgetinfo -help |
Document Information Options
The following table describes the options you can use to retrieve basic information about PDF documents. For more information about these options, see Getting Document Information.
| Option | Function | Description | Example |
|---|---|---|---|
| -summary | Display summary information (default) | Displays summary information about a PDF document, including document description information, bookmark information, annotation information, and font information. | apgetinfo -summary path\input.pdf |
| -info | Display document Information Dictionary | Displays document description information contained in the document information dictionary. (This is equivalent to the Acrobat Document Properties feature.) It includes data that identifies the file, such as its title, author, creation date, size, and PDF version number. | apgetinfo -info path\input.pdf |
| -font | Display font information | Displays information about the fonts used and embedded in the document. | apgetinfo -font path\input.pdf |
Page Size Information Option
The following table describes the option for retrieving page size information. For more information about this option, see Getting Page Size Information.
| Option | Function | Description | Example |
|---|---|---|---|
| -pagesize | Display size of all pages | Displays the MediaBox coordinates, CropBox coordinates, and degree of rotation for each page in the document. The MediaBox is the full page. The CropBox is the working space within the margins. | apgetinfo -pagesize path\input.pdf |
Bookmark Information Options
The following table describes the options you can use to retrieve bookmark information. For more information about these options, see Getting Bookmark Information.
| Option | Function | Description | Example |
|---|---|---|---|
| -bookmark | Display bookmark information | Lists all document bookmarks, numbered and indented according to level. | apgetinfo -bookmark path\input.pdf |
| -page | Output to include page numbers; requires -bookmark option | Displays the page number of each bookmark. | apgetinfo -bookmark -page path\input.pdf |
| -path | Output to include full bookmark path; requires -bookmark option | Displays the full document path for each bookmark, beginning with the document title, with levels separated by a vertical bar. | apgetinfo -bookmark -path path\input.pdf |
| -nolevel | Output to not include indent level; requires -bookmark option | Displays bookmarks without any indication of level. | apgetinfo -bookmark -nolevel path\input.pdf |
| -dest | Output to include named destinations, if they exist; requires -bookmark option and -page option | Includes any named bookmark destinations. These are links to specific locations in the current or other documents. They can be user defined or generated automatically by PDF creation software. | apgetinfo -bookmark -page -dest path\input.pdf |
| -count | Output to include total number of bookmarks in the document; requires -bookmark option | Displays the total number of bookmarks in the document. | apgetinfo -bookmark -count path\input.pdf |
Annotation Information Options
The following table describes the options for retrieving annotation information. For more information about these options, see Getting Annotation Information.
| Option | Function | Description | Example |
|---|---|---|---|
| -annot | Display annotation information | Displays information about annotations, such as notes, text, audio, stamps, form fields (widgets), files, pencil marks, rectangles, ellipses, lines, highlights, strike outs (crossthroughs), and underlines. | apgetinfo -annot path\input.pdf |
| -color | Output to include annotation color information; requires -annot option | Displays the color of annotations as RGB values to six decimal places. | apgetinfo -annot -color path\input.pdf |
| -popup | Output to include popup annotation information; requires -annot option | Reports the existence of an annotation pop-up. The pop-up is listed directly after the annotation it is associated with, but the text is listed with the annotation, not the pop-up. | apgetinfo -annot -popup path\input.pdf |
| -rect | Output to include annotation rectangle; requires -annot option | Indicates the location and size of the annotation rectangle by describing its coordinates, in points, with reference to the bottom left of the cropped page. For example: | apgetinfo -annot -rect path\input.pdf |
| -link | Output to include link annotations; requires -annot option | Displays information about document links. | apgetinfo -annot -link path\input.pdf |
Form Field Information Option
The following table describes the option for retrieving form field information. For more information about this option, see Getting Form Field Information.
| Option | Function | Description | Example |
|---|---|---|---|
| -formfield | Display form field information | Displays information about form fields, including field name, field type, and field value. Form fields include text boxes, multiline text boxes, check boxes, combo boxes, list boxes, buttons, radio buttons, and signatures. | apgetinfo -formfield path\input.pdf |
Metadata Option
The following table describes the option for retrieving XML metadata. For more information about this option, see Exporting XML Metadata.
| Option | Function | Description | Example |
|---|---|---|---|
| -metadata | Display metadata | Exports XML metadata from a PDF file saved or created in Acrobat 5.0 or above. The metadata is specified in XMP, Adobe’s eXtensible Metadata Platform. XMP, is based on RDF (Resource Description Framework), a standard model for supplying metadata. There are two schemas associated with XMP: PDF and XAP. This option displays metadata in both formats. | apgetinfo -metadata path\input.pdf |
Input and Output Options
The following table describes the options for managing file input and output. For more information about these options, see Managing Input and Output.
| Option | Function | Description | Example |
|---|---|---|---|
| -d | User password to open this document | The password required to open a PDF document encrypted with a User password. Secured PDF files can have two types of passwords: User passwords and Owner passwords. (A User password is also known as an Open password, because it is used to open documents.) If your document is encrypted with a User password, you must supply it immediately following the -d option. (Owner passwords do not work with APGetInfo.) | apgetinfo -d password [options] path\input.pdf |
| -name | Include file’s name in output | Places the name of the file being processed in the output. This is especially useful when you run multiple commands or include multiple input files on a command. |
apgetinfo -name [options] path\input.pdf |
| -n | Do not write information to screen | This option will suppress information from being written to STDOUT. | apgetinfo -n [options] path\input.pdf |
| -cmds | Path to the file of commands | Process multiple commands quickly and efficiently in one run. For more information on the -cmds option, see Command Collections. | apgetinfo -cmds File.txt |
| -o | Output filename | Specifies an output file. The path and name of the output file must immediately follow the -o option. If you want your output file to go to a particular directory, be sure it exists beforehand. APGetInfo will not create a new directory. | apgetinfo -o path\output.txt [options] path\input.pdf |
Reporting Options
The following table describes the options for reporting progress and error messages. These options are helpful for debugging and understanding how APGetInfo works. For more information about these options, see Reporting Progress and Errors.
| Option | Function | Description | Example |
|---|---|---|---|
| -p | Provide progress messages | Write progress messages and/or errors to STDOUT | apgetinfo -p [options] path\input.pdf |
| -l | Write progress to the given log file name | Saves the progress and error messages to a user-specified text file instead of the default log file, apgetinfo.log. The name of the text file must directly follow the -l option. (By default, APGetInfo writes any error messages to the screen, STDOUT, and to the default log file, apgetinfo.log.)
Note: If the log file you specify is a read-only file, a warning is displayed and nothing is written to the log file. Make sure that your log file is write-enabled. |
apgetinfo -l path\mylogfile.txt [options] path\input.pdf |
| -p and -l combined | Write progress and error messages to the given log file name | If the -p and -l options are both specified, progress and error messages will be written to the file that you specify. | apgetinfo -p -l path\mylogfile.txt [options] path\input.pdf |
Registration Number
The following table describes how to pass the registration number to APGetInfo.
Note: Do not call the apgetinfo script from another script or application. Call apgetinfoapp directly, as shown in the example below.
| Option | Function | Description | Example |
|---|---|---|---|
| -r | Pass APGetInfo registration number | This option can be used to supply your registration number to APGetInfo from a script or another application. This option is typically not necessary and is available for use in cases where the Appligent License File can not be located by the application because of runtime environment restrictions. | apgetinfoapp -r XXXX-XXXX-XXXX-XXXX-XXXX-XXXX [other options] |
Command Collections with APGetInfo
The -cmds option allows you to process a collection of files at one time
To process multiple commands quickly and efficiently, use the -cmds <filename> option. The file specified by -cmds, the commands file, should contain one or more single line commands. Each command is just like an ordinary command-line without the executable name. The commands file does not support wildcards in filenames. The following is an example of command line syntax when running with -cmds:
$ ./apgetinfo -p -l logfile.txt -cmds CommandFile.txt
CommandFile.txt contains a list of commands for APGetInfo to process. This is an example of the CommandFile.txt:
-d userpass -info /Appligent/APGetInfo/samples/ApUtilsSampleEnc.pdf
-bookmark -count /Appligent/APGetInfo/samples/ApUtilsSample.pdf
-annot -color /Appligent/APGetInfo/samples/ApUtilsSample.pdf
Troubleshooting
Introduction
This chapter describes what you can do if you do not get the results you expect when you run APGetInfo:
- Review the troubleshooting checklist
- Clean suspect PDF files. If you cannot solve the problem, refer to Support to find out how to contact customer support.
Reviewing the Troubleshooting Checklist
This troubleshooting checklist describes common problems. It is the first place to look for a possible solution to your problem.
All platforms
Are you trying to retrieve information from one or more encrypted files?
You must specify the -d option, followed by a User password, as in the following example. (An Owner password will not work.)
You can only specify one User password. Therefore, all of the encrypted files you include on the command line must have the same User password. If you want to retrieve information from encrypted files that have different User passwords, run a separate command for each User password.
Are you using any options that require a file name (-o, -l)?
The file name must immediately follow the option, as in the following examples:
-o C:\Appligent\APGetInfo\samples\myoutput.txt
-l /Appligent/APGetInfo/mylogfile.txt
If a text string other than a file name follows the option, APGetInfo will recognize that text string as the file name.
Did you receive an error “this file cannot be found”?
You may not have provided the correct path for all files or you may have misspelled a file or directory name.
Is each input file a PDF document?
APGetInfo can only open PDF files. If you are using wildcards, include the .pdf suffix (for example, *.pdf) to help prevent you from accidentally attempting to open a non-PDF file.
Are you using APGetInfo in a script?
Use full path names for all files and applications accessed from within the script. If you cannot get your script to work, make sure that you can run APGetInfo from a command line.
Are you getting unexpected results from one or more PDF files?
There might be something wrong with the file. See Cleaning up PDF Documents below.
UNIX only
Did you get a “command not found” error?
If you get a command not found error when running APGetInfo in its own directory, enter the command with the dot-slash in front of it, as in the following example:
./apgetinfo /Appligent/APGetInfo/samples/APUtilsSample.pdf
This tells your system that the application is in the current directory.
Do the application files have the execute permissions set?
If they don’t, you must set them.
Cleaning Up PDF Documents
Not all PDF files are created equal. The way in which a PDF document is generated makes a difference, and PDFs generated by third party tools in particular can vary in quality. PDF documents can also become corrupted.
To check how the file was created:
- In Acrobat X, XI and DC select File > Properties… and click Description. Under Advanced, look at PDF Producer.
If the PDF Producer field is blank, consider the file suspect.
Making a Clean PDF
If you are having problems with a specific PDF, try to create “clean” version of your document. There are two ways of doing this using Adobe Acrobat. If you use other PDF manipulation software, check the documentation for functions that may be equivalent to those found in Adobe Acrobat.
Method 1: “Optimize” your PDF
- In Acrobat X, XI and DC > File Menu > Save As > Optimized PDF
If saving as optimized does not work, distill the document by following the steps below.
Method 2: Distilling PDF Documents
Distilling a document will remove all comments and form-fields from the PDF. If the PDF contains these items and you wish to preserve them, you must save them before Distilling.
To save existing comments
- In Acrobat X, XI and DC select Comments > Comments List > click the Options icon > Export All to Data File… In the Export Comments dialog box, select a name and location for the Forms Data File (.fdf), and click Save.
See the additional step below for saving form fields (if any):
Delete all comments:
- In Acrobat X, XI and DC select all the comments in the Comments List pane and press the Delete key.
To save form fields (if any):
- Save a copy of the original file. You will copy and paste the form fields from the original file into the new file after the distilling procedure.
Distilling the document
To distill a PDF document do the following:
- In Acrobat X and XI select File > Save As > More Options > PostScript. Choose a name and location for the file and click Save.
- In Acrobat DC select File > Export to > PostScript. Choose a name and location for the file and click Save
- Open Acrobat Distiller > select File > Open… In the Open PostScript File dialog, locate the PostScript file created in the previous step and click Open.
The distiller will create a new PDF file with the same name and location as the PostScript file.
Restoring comments
To restore the comments:
- In Acrobat X and XI, select Comments > Comments List > click the Options icon > Import Data File… In the Import Comments dialog box, locate the Forms Data File (.fdf) previously saved and click Select. In the next pop-up box, click Yes. The comments are restored.
- In Acrobat DC, select Tools > Comments > Comments List > click the Options icon > Import Data File…In the Import Comments dialog box, locate the Forms Data File (.fdf) previously saved and click Select. In the next pop-up box, click yes. The comments are restored
Restoring form fields
To restore form fields:
- Open the original PDF file that includes form fields.
- In Acrobat X and XI select Tools > Forms > Edit Form)
- In Acrobat DC > select Tools > Prepare Form > Form fields will automatically appear
- The form fields will appear, do a Control-A to select all the form fields.
- Open the new distilled PDF file which has no form fields.
- Do a Control-V to paste all the form fields onto the page.
You may need to reposition the fields by selecting them again with the Select Object Tool and moving them to the correct position. For multi-page forms you must do this for each page separately.
Support
You can contact support directly by sending an e-mail to support@appligent.com. Support e-mails are answered within one business day during the normal business hours listed below.
Telephone & Fax
- Telephone: +1 610 284 4006
- Fax: +1 610 284 4233
To better serve you, please call us during our normal business hours, Monday - Friday, 8:00 am - 5:00 pm U.S. EST/EDT.
International Support
Customers from locations outside the United States, including Germany, United Kingdom, Canada and Australia can contact us directly or connect with one of our many resellers.
When contacting support please provide the following information:
- Name of the Product
- Product Version Number
- Operating System
- Your Name
- Company Name
- Your Email Address
- Your Phone Number
- Product Registration Number
- Any files to help us reproduce your problem (if needed)
APGetInfo Readme
New Features
Please refer to the APGetInfo User Guide for additional information.
APGetInfo 4.0
- -d — User password to open a document. If a file contains a user and owner password, please supply the user password in order to see the correct security options set on the PDF file.
- -name — Include the PDF filename in the output document.
Note: Previous versions used the -n option to include the name in the output file. -n should now be used to suppress sending information to STDOUT, see below.
- -n — Suppress information written to STDOUT.
- -cmds <filename> — To process multiple commands quickly and efficiently, use the -cmds <filename> option. The file specified by -cmds, the commands file, should contain one or more single line commands. Each command is just like an ordinary APGetInfo command line without the executable name. The commands file does not support wildcards in filenames.
When you use the -cmds option, many of the APGetinfo options should be set in the -cmds file instead of on the command line. The following options are supported on the command line when using the -cmds option: -r, -l, -p, -n For more information on the -cmds option, see Command Collections.
New information reported with -info and -summary flags:
PageMode: Will return on the following settings:
DontCare: use default settings
UseNone: do not display pane
UseThumbs: show the pages pane
UseBookmarks: show the bookmarks pane
FullScreen: use full screen mode
ISO Extension Level: Is the document ISO 32000 or not.
AcrobatForm: Will report Yes if there are active form fields and No if there are not.
Encryption options reported:
KeyLength: 40, 128 or 256 bit
Encryption Method: RC4 or AES
UserPassword
OwnerPassword
Print
ChangeDoc
ContentCopy
FillOrSign
Accessible
Commenting
Assembly
For the encryption options, if an option is “allowed”, you will see “Yes”. If the option is “not allowed”, you will see “No”.
Deprecated Features
-u — This option was used in previous versions to specify a user password. This flag has been replaced by -d.
APGetInfo 3.0
APGetInfo 3.0 combines the functionality of five utilities which were previously sold separately as APGetInfo, APGetBookmarks, APGetAnnotInfo, APGetFormFields, and APGetMetadata. With APGetInfo 3.0, you can retrieve the following information from PDF documents:
- Document description information that identifies a file, such as its title, author, creation date, and size. This is similar to the descriptive information you would find with Adobe Acrobat’s Document Properties feature.
- Font information, including font name, font type, and embed status.
- The size and rotation of each page.
- A list of bookmarks. The list can be formatted to show or hide bookmark levels using indention and numbers, or display the full document path of each bookmark. Bookmark page numbers, named destinations, and the total number of bookmarks can be added to the list.
- Information about links, annotations, and the popups associated with annotations. The color and coordinates of each annotation can be included with the output.
- Form field information, including field name, field type, field value, and alternative name (tool tip text).
- XML metadata for files created or saved in Acrobat 5.0 or above. Both PDF and XAP schemas are displayed.
- A summary that includes document description information, number and type of annotations, number of bookmarks, and font information.
Known Issues
High ASCII characters do not always display correctly in the output.
Special formatting characters, such as carriage returns, may not be stripped from the text of bookmarks and could be displayed as odd characters.
Unicode information (in bookmarks, form fields, etc.) is not supported and will not be reported correctly.
To Get Help
Contact technical support by:
emailing support@appligent.com, or calling 610-284-4006
Please provide the following:
Product name and version number
Operating system
Your name, company name, email address, and phone number
Description of your question or problem
Responses are typically emailed within one business day.